How to Set Up a Microsoft SQL Server Database for Primavera P6 Professional
There are times when we need to take a step forward in the use and management of Primavera P6 Professional within Project Planning and Control. In this article, we are going to teach you how to set up a Microsoft SQL Server Database for Primavera P6 Professional. Are you ready?
SUBSCRIBE TO OUR YOUTUBE CHANNEL
How to Set Up a Microsoft SQL Server Database for Primavera P6 in 8 Steps
Before you continue reading, we suggest you take a look at our article about two of the database configurations offered by Primavera P6 Professional that are most commonly used when working with this powerful project planning and control tool.
Step 1: Install Microsoft SQL Express on Your Computer
The first step to configure a Microsoft SQL Server Database for Primavera P6 is to install Microsoft SQL Express Server. From the Microsoft website, you have the option to download SQL Server either on-premises or in the cloud. They also provide the possibility to download a free version (Developer or Express). In our case, we will select the free “Express” option to download.
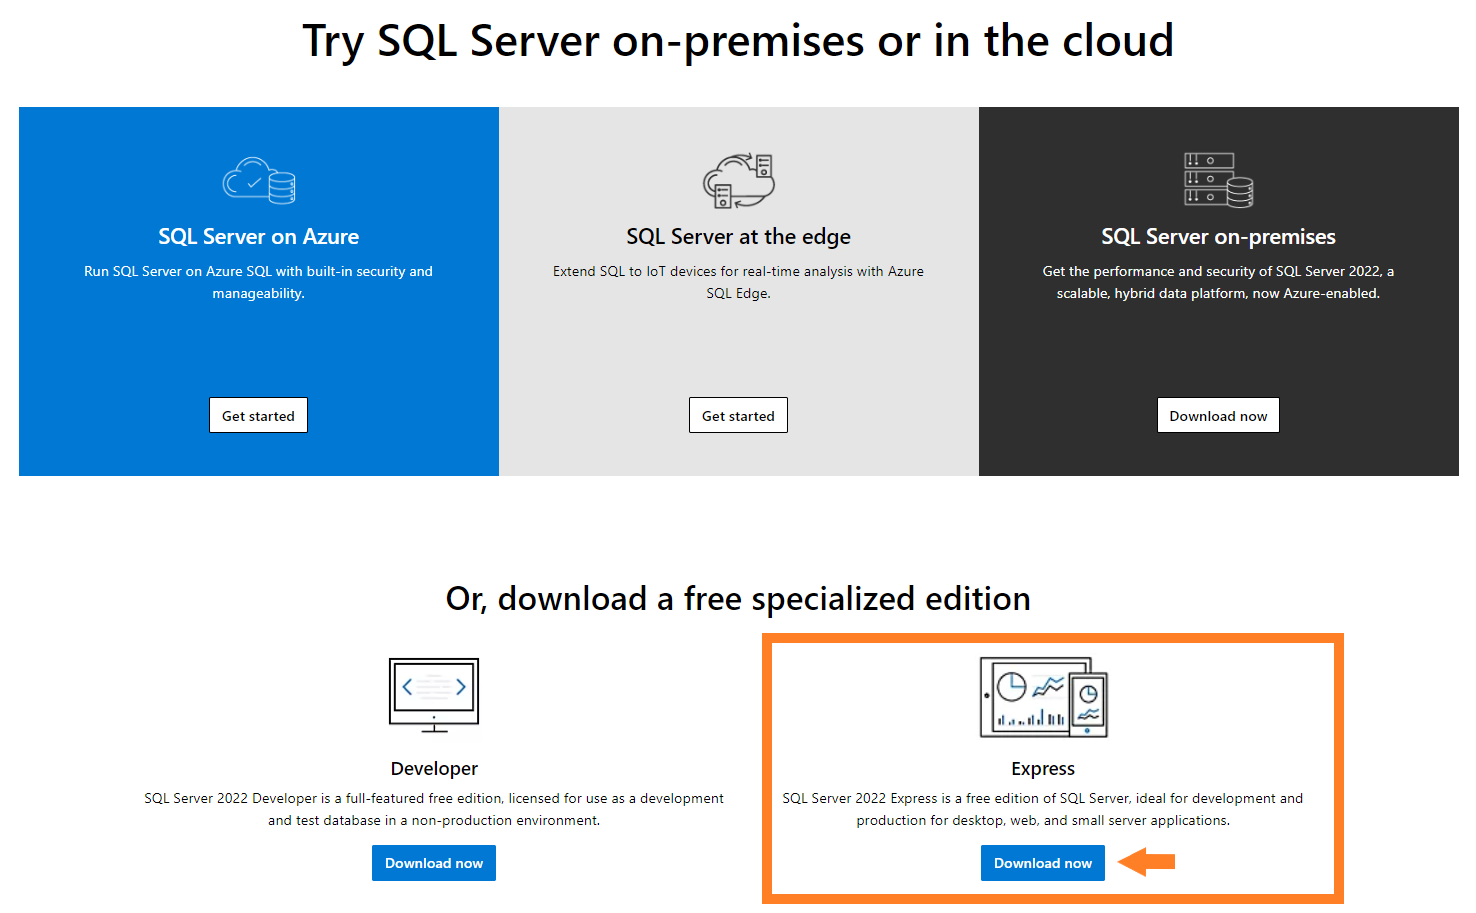
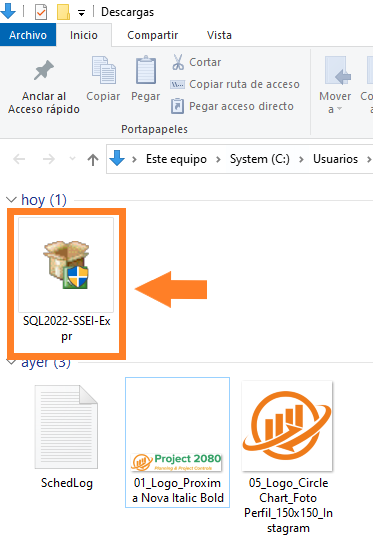
Once you click the “Download now” button, the download will start automatically, and you can find it in the “Downloads” folder on your computer. Open the folder and double-click the executable file (“.exe”) to start the installation process.
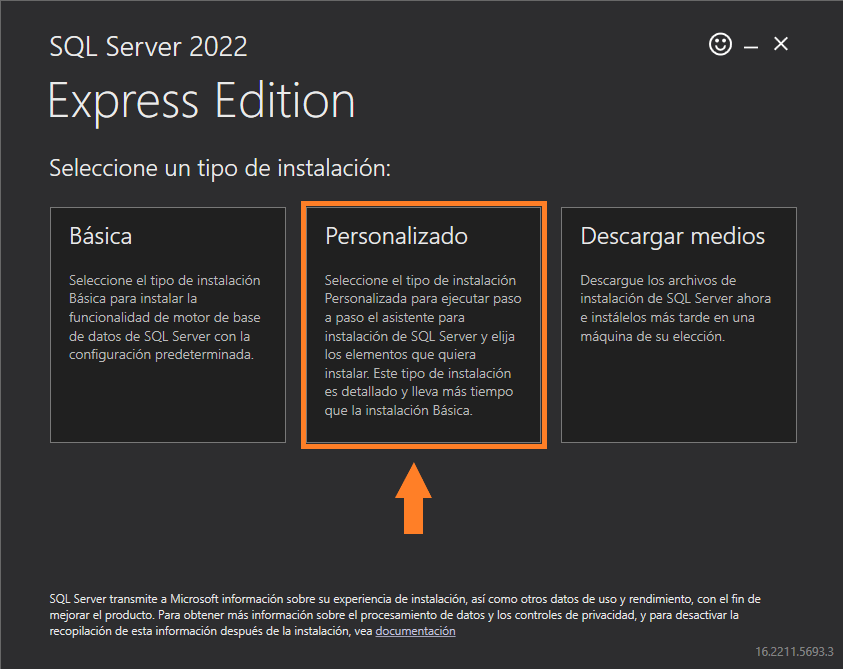
Next, in the window that opens, select the installation type “Custom” to go through the installation wizard step by step and choose the components you want to install.
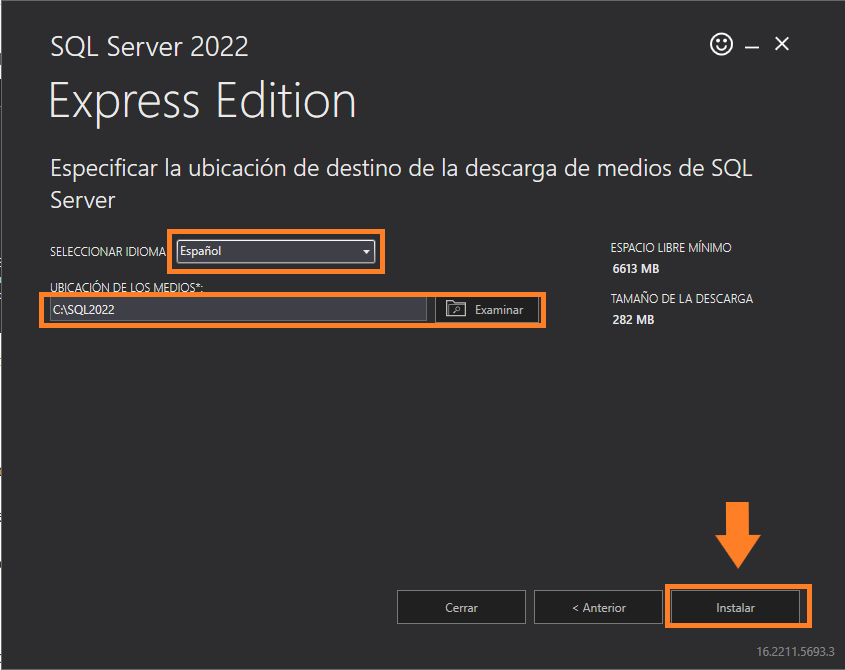
Once you have selected the “Custom” installation type, it will ask you to select the installation language and the directory where it will be installed. After making your selections, click the “Install” button.
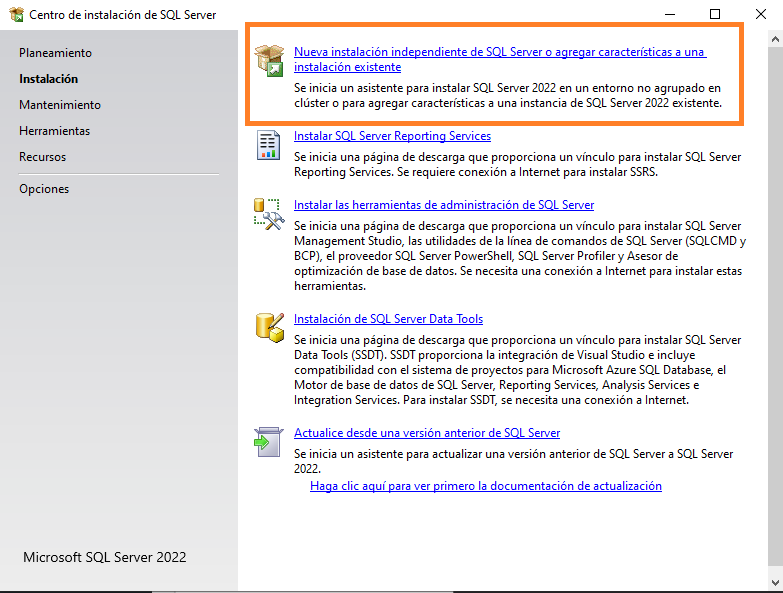
Next, the SQL Server Installation Center will open to start the installation process. To proceed, select the option “New SQL Server stand-alone installation or add features to an existing installation,” and a wizard will begin to install SQL Server 2022 (or the version available at the time you are reading this article). After this, a SQL Server Configuration window will appear.
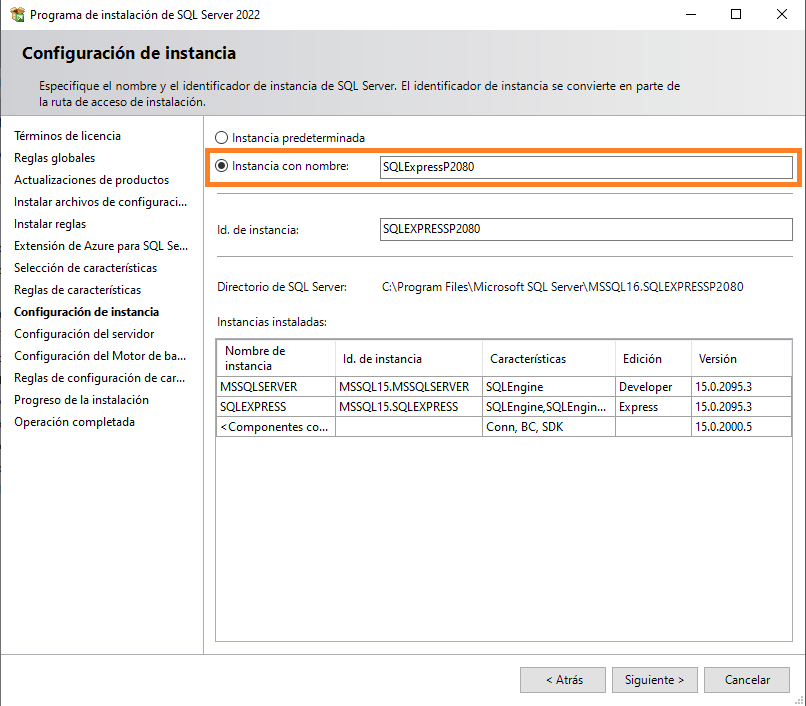
Start by accepting the “License Terms” and other configuration points by clicking “Next” to proceed with the installation. When you reach the “Instance Configuration” step, you will need to specify the name to be used in the SQL Server installation path. By default, the instance name will be “SQLExpress.” However, for this article, we decided to use the name “SQLExpressP2080” since the “SQLExpress” instance is already in use. You can modify the instance name at any time. NOTE: make sure to write down this name as you will need it later. Once you have chosen an instance name, click the “Next” button.
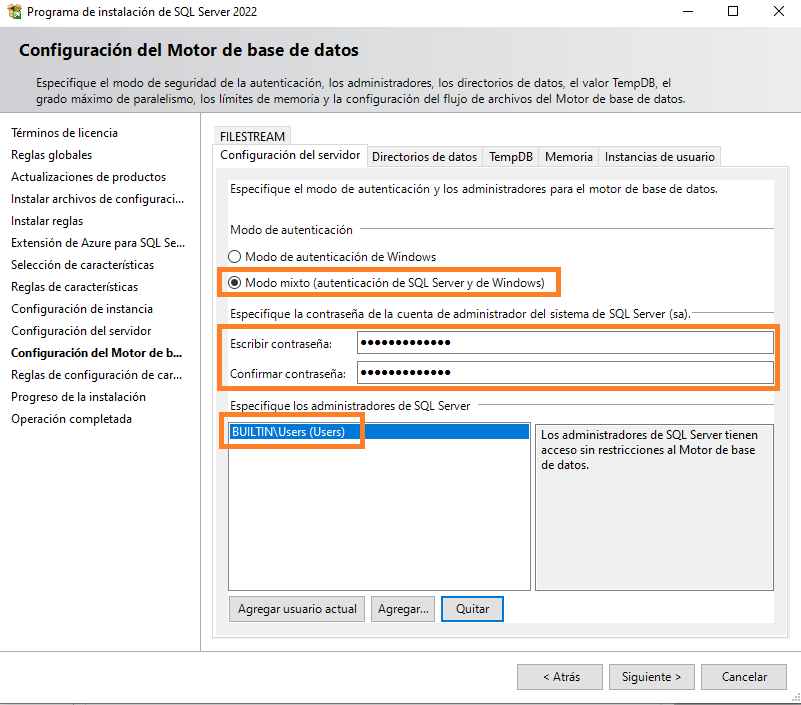
Continue clicking the “Next” button in the following windows until you reach the “Database Engine Configuration” option. In this window, select “Mixed Mode” as the “Authentication Mode,” and specify the password for the SQL Server system administrator account. Once this is done, specify the SQL Server administrators. NOTE: write down both the password and the SQL Server administrators you specified, as you will need them later. After completing this step, click the “Next” button to proceed with the installation.
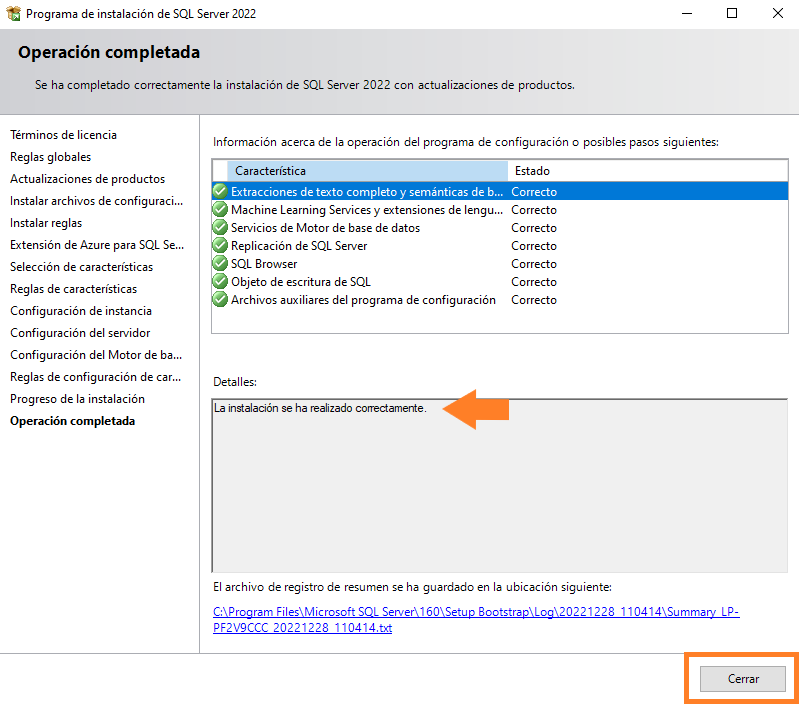
Continue the installation using the default configuration for the following screens, clicking “Accept” or “Next” as appropriate. Once the installation has been successfully completed, you should see a screen similar to the one below, showing information about the installation configuration, installation details, and the “log” file path. Then, click the “Close” button to exit the SQL Server Installer.
Step 2: Install Microsoft SQL Server Management Studio (SSMS) on Your Computer
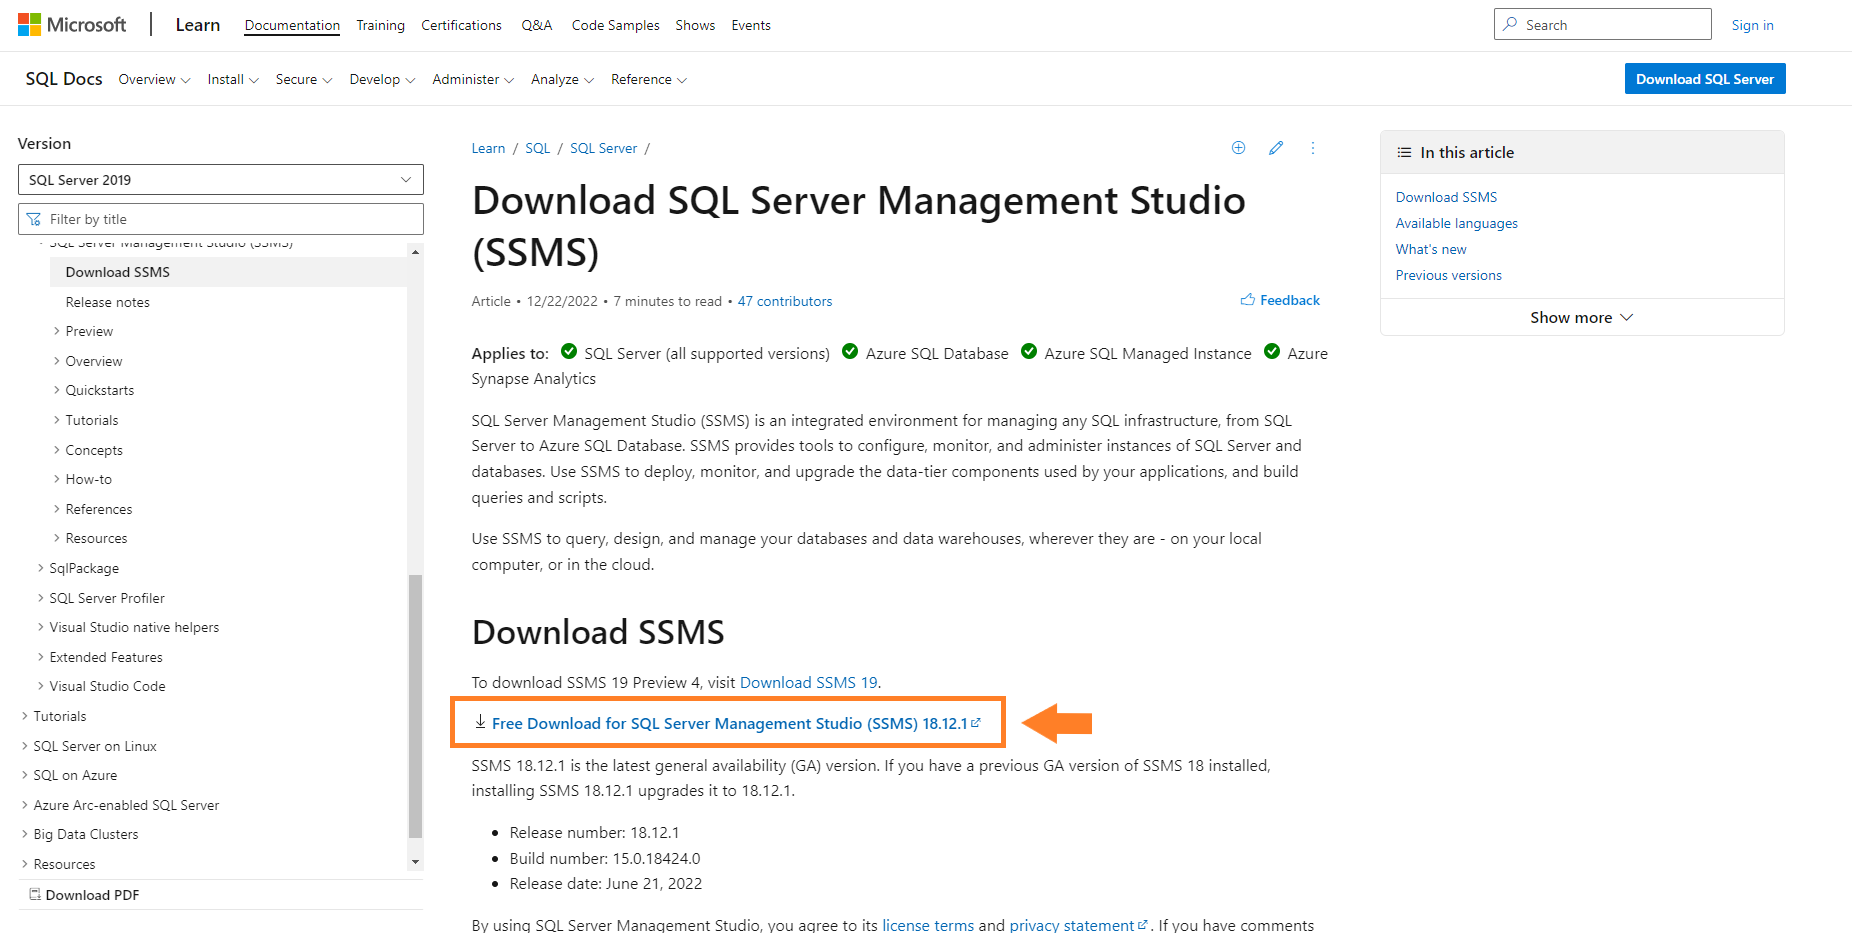
Once Microsoft SQL Express Server is installed, you will need to download and install Microsoft SQL Server Management Studio (SSMS). You can download the installer from this download link by clicking on the link under the title “Download SSMS,” as shown in the screenshot below. Once you click the link, the download will begin automatically.
As in the previous step, the download will have been saved in the “Downloads” folder. Double-click the file to run the installation package, and the Microsoft SQL Server Management Studio installation window will appear. Next, click the “Install” button. Use the default configuration as the software installation proceeds.
Verify that Microsoft SQL Express Server and Microsoft SQL Server Management Studio Have Been Installed Correctly
Before moving on to “Step 3” of our guide on “how to set up a Microsoft SQL Server Database for Primavera P6 in 8 steps,” let’s verify that both Microsoft SQL Express Server and Microsoft SQL Server Management Studio (SSMS) have been installed correctly.
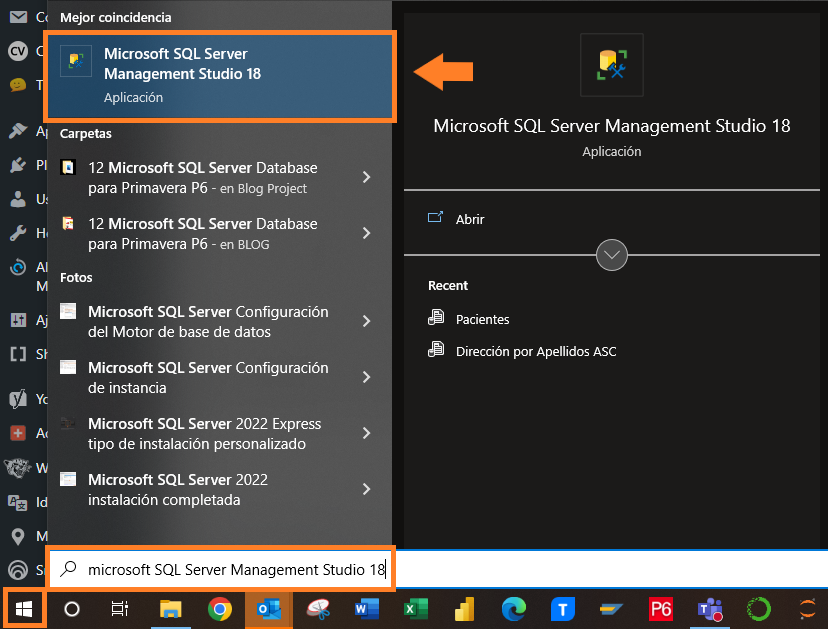
We’ll start by opening Microsoft SQL Server Management Studio (SSMS) from the Windows Start menu on your computer’s taskbar.
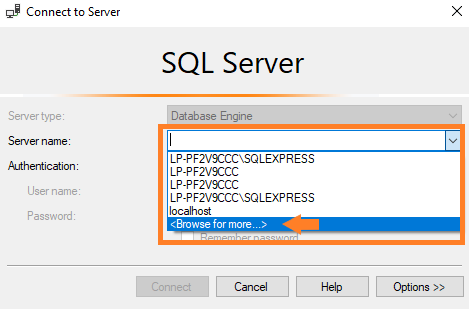
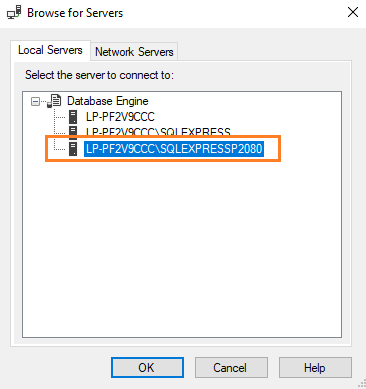
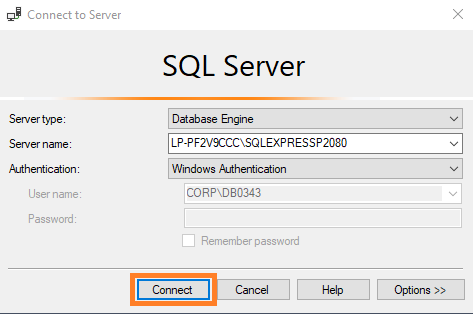
Once you click the “Open” button, the program will prompt you to log in to the SQL Server. Remember that in Step 1, we configured a new instance named “SQLExpressP2080,” which we need to find in the “Server name” field or by selecting “<Browse for more…>”. Under the “Database Engine” dropdown, our database engine “SQLExpressP2080” should appear.
In Authentication, you can choose between logging in using Windows Authentication (“Windows Authentication”) or SQL Server Authentication (“SQL Server Authentication”). With Windows Authentication, you won’t need to enter any credentials. With SQL Server Authentication, you will need to enter a username and a password. The username will be “sa” (which stands for Server Administrator), and the password will be the one you set during the Microsoft SQL Server Express installation process in Step 1. We recommend keeping Windows Authentication selected. Finally, select “Connect.”
If you haven’t received any error message indicating that login failed, you will now be logged into SQL Server. We can now proceed with the next steps to configure a Microsoft SQL Server Database for Primavera P6.
Step 3: Configure the TCP/IP Port on Your SQL Express Server
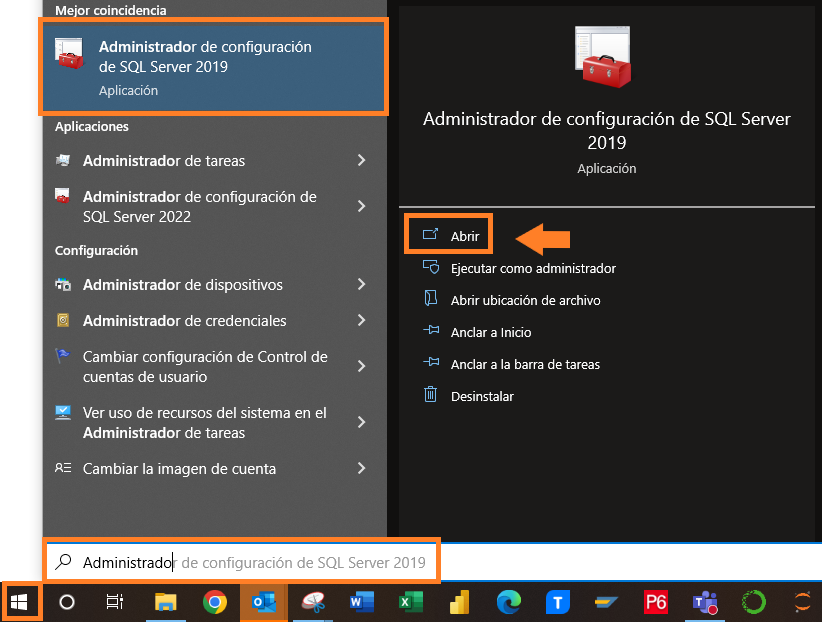
The next step is to configure the TCP/IP port for the SQL Express server. It’s important to highlight that if you don’t complete this step, you won’t be able to configure the database. To do this, open the “SQL Server 2019 Configuration Manager.” As in the previous step, you can open it from the Windows Start menu on your computer’s taskbar.
In the SQL Server Configuration Manager, expand “SQL Server Network Configuration” and select “Protocols for SQLEXPRESSP2080” (in your case, select the SQL Server instance you created).
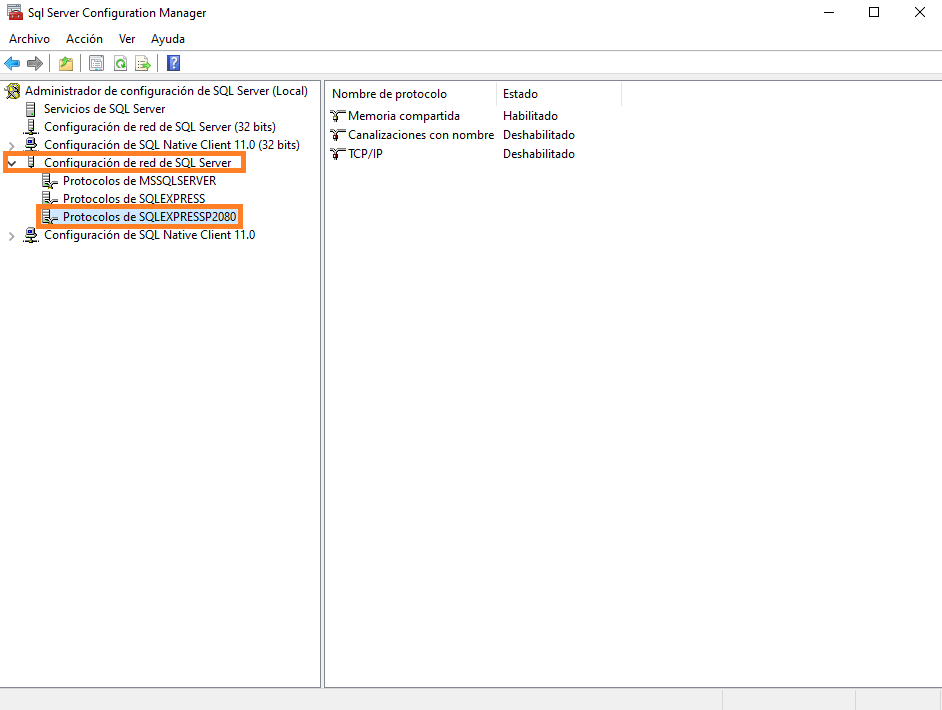
Once selected, the different protocols will appear in the right-hand window. Select “TCP/IP” and open the context menu by right-clicking. Choose “Enable.” A dialog box will then appear, prompting you to restart the service. Click “OK.”

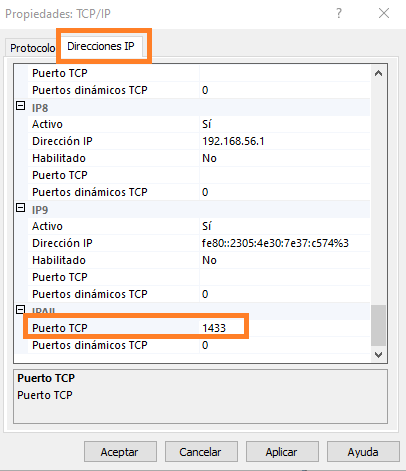
Again, right-click on “TCP/IP” and now select “Properties.” In the TCP/IP properties window, navigate to the “IP Addresses” tab and scroll down until you find “IPAII.” Once located, in the row labeled “TCP Port,” click the empty cell on the right and type “1433.” After entering the port number, click “OK,” and a new dialog box will inform you that changes have been saved but will not take effect until the service is stopped and restarted. Click “OK” to exit the dialog box.
Now, you are ready to restart SQL Server directly from within the “SQL Server Configuration Manager.” To do this, select “SQL Server Services” in the left-hand pane. Then, in the right-hand window, select “SQL Server (SQLEXPRESSP2080)” (or the instance you created) and open the context menu by right-clicking, then choose “Restart.”
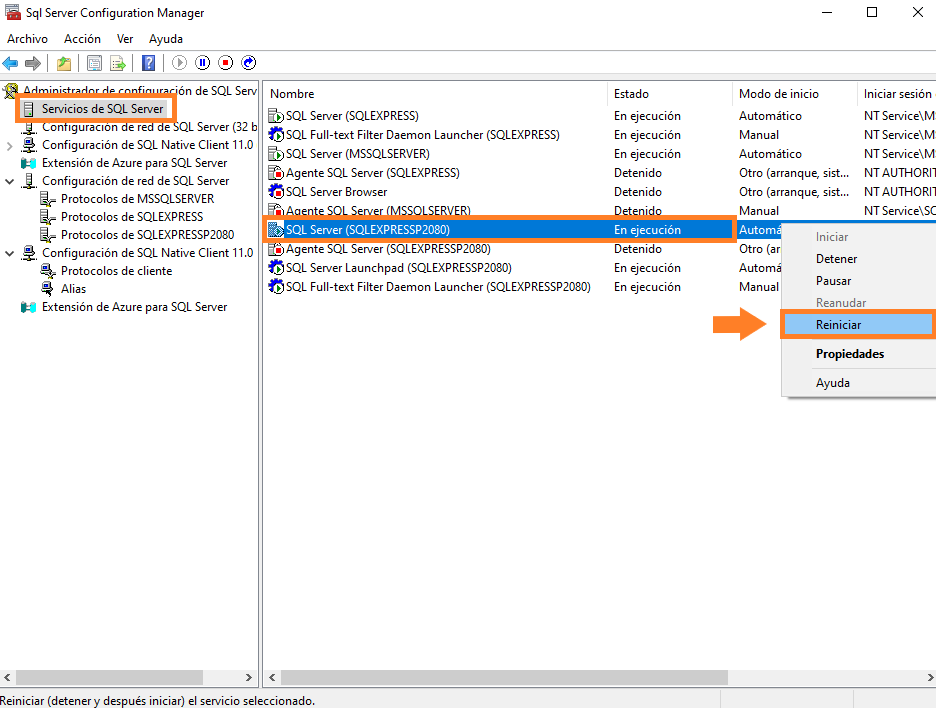
Once the SQL Service has restarted successfully, you can close the “SQL Server Configuration Manager” and proceed with the next steps in this guide.
Step 4: Download the Primavera P6 Database Configuration Tool
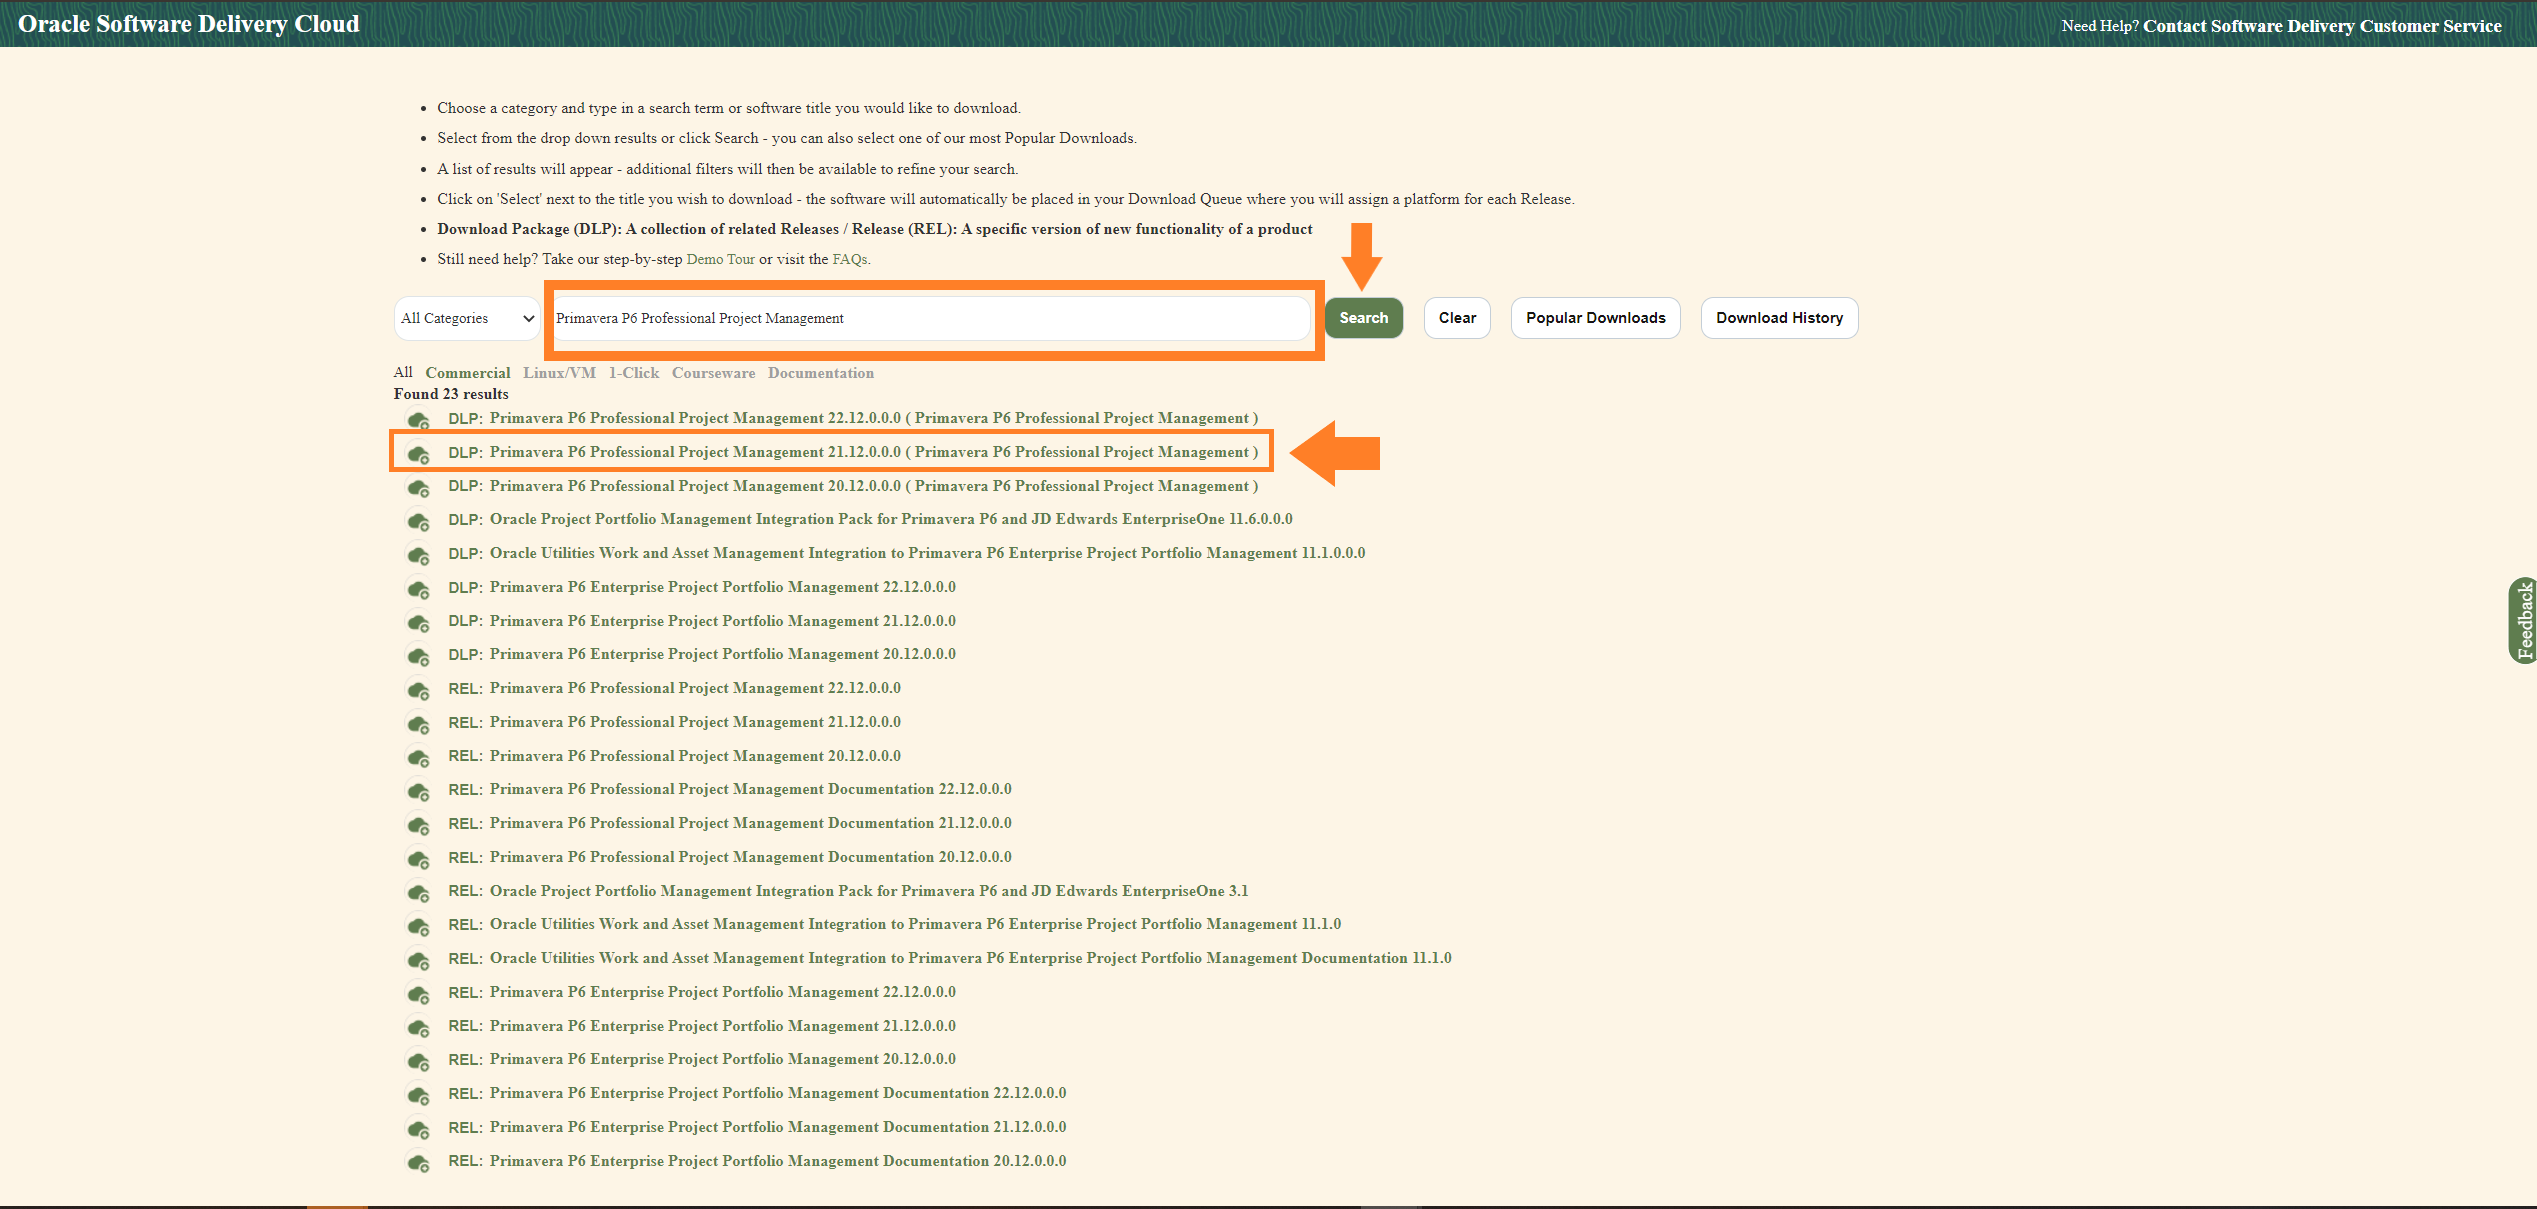
Now that we have configured SQL Server on our computer, it’s time to download the packages related to Primavera P6 Professional. To do this, we will download all the installation files we need from the Oracle Software Delivery Cloud. To download files from Oracle Cloud, the first thing you need to do is create an account. Once your account is created, search for “Primavera P6 Professional Project Management” and select the version you want. In our case, we selected version 21.12.
Once you have selected one of the versions offered by Oracle, it will be added to your cart, and you can click “Continue.”

You will need to download at least three files: one for the Applications, another for the Database Configuration, and a third for API integration. In our case, having selected the DLP option, it includes a file with documentation about the selected software. Note the name of the file referring to the Database Configuration (in our case, the file is named V1018841.zip), as it will be used in this step. The other two files will be used in Step 8. Press the “Download” button.
An Oracle download manager will be downloaded, which you need to run. A window will open where you must select the destination for the compressed files. Once selected, press “Next.”

The compressed files will be downloaded to the destination you chose. In our case, they will be located in the “Downloads” folder. Select the “.zip” file corresponding to the Database Configuration and extract all files to a new folder by right-clicking and selecting “Extract All.”
Another important step is downloading and installing Java, which we will now proceed to cover.
Step 5: Download and Install Java
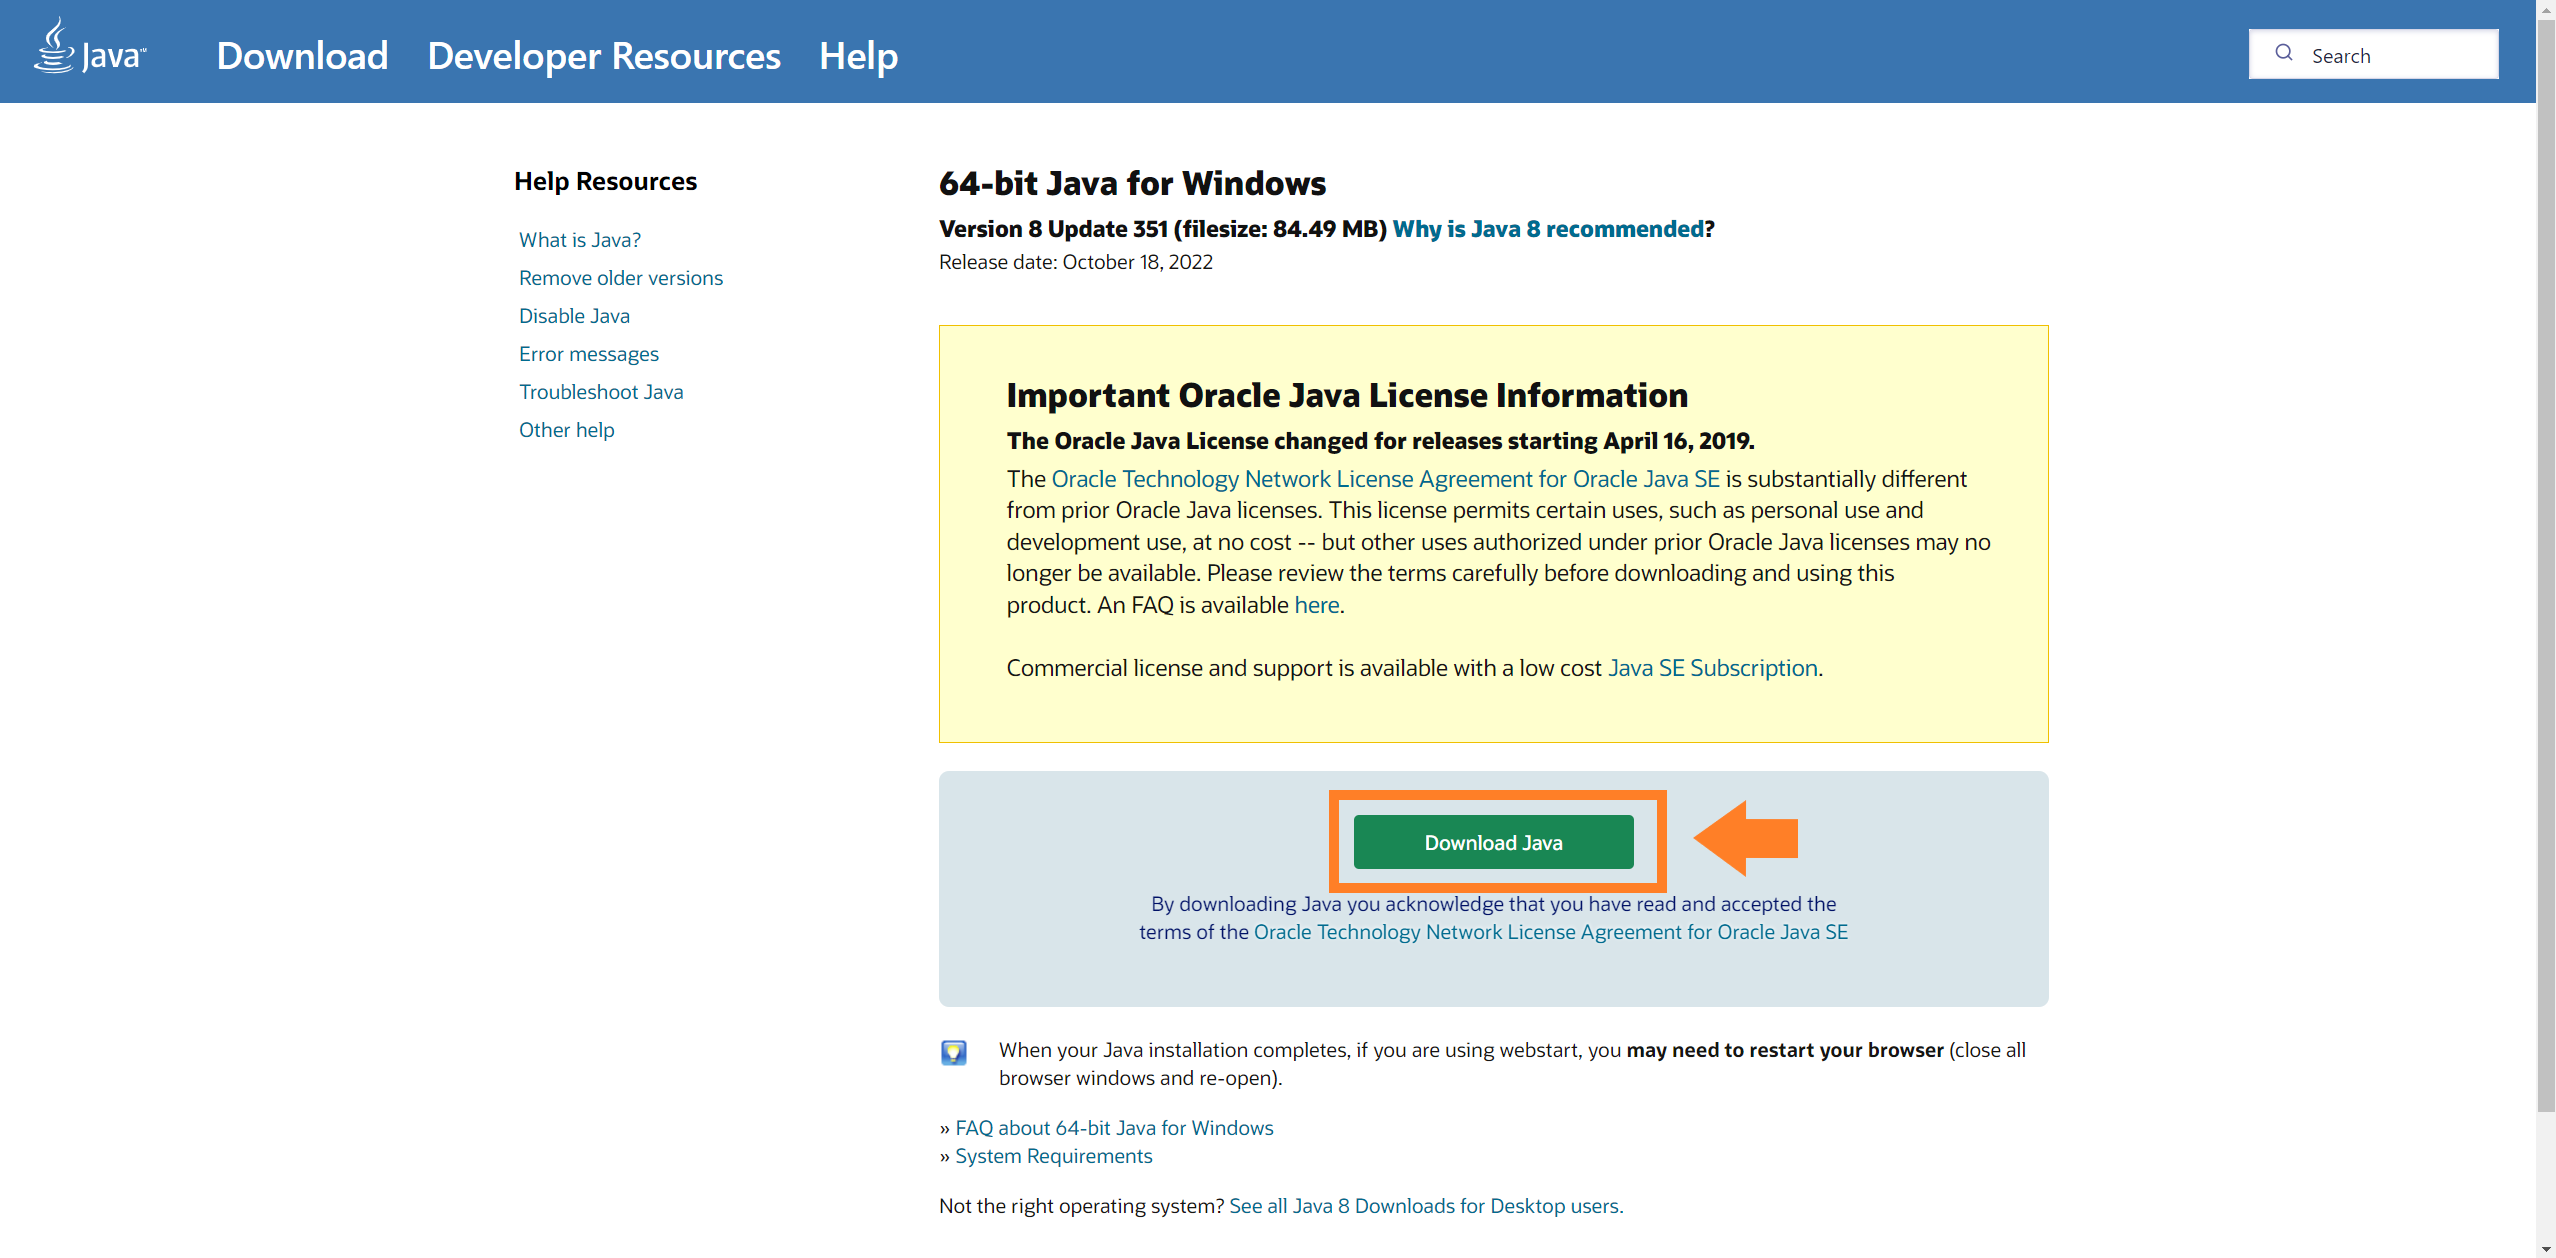
In this step, we will need to download and install Java on our computer. To do this, visit the Java download page. Click on the “Download Java” button, and the download will start automatically in your computer’s “Downloads” folder.
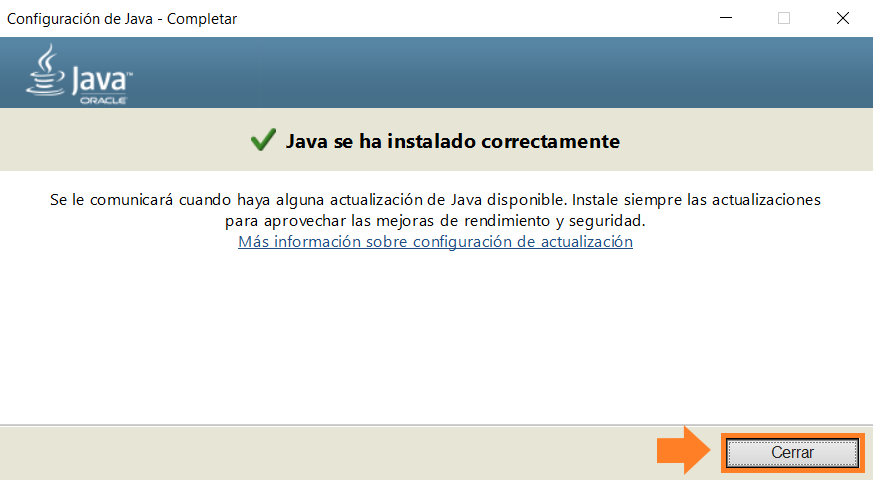
Once the download is complete, navigate to the “Downloads” folder and double-click the .exe file we just downloaded. In the installation window that opens, click “Install.”

Once the installation is complete, a screen similar to the one below should appear. Click the “Close” button to close the screen and proceed to the next step.
Step 6: Configure the JAVA_HOME Environment Variable
Once Java is installed on our computer, we need to define the JAVA_HOME environment variable in Windows. If we don’t do this, we won’t be able to use the Primavera P6 Professional database installation tool.
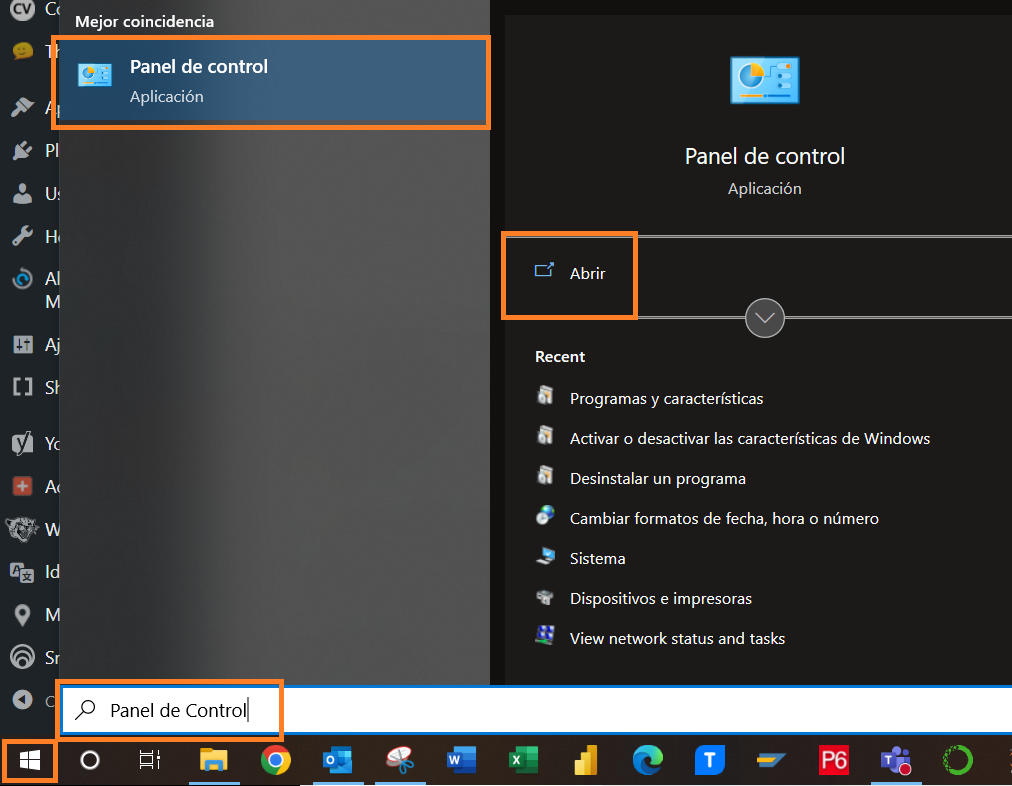
To configure the JAVA_HOME environment variable in Windows, you need to access the Control Panel. To do this, go to the Windows Start button, type “Control Panel,” and open it.
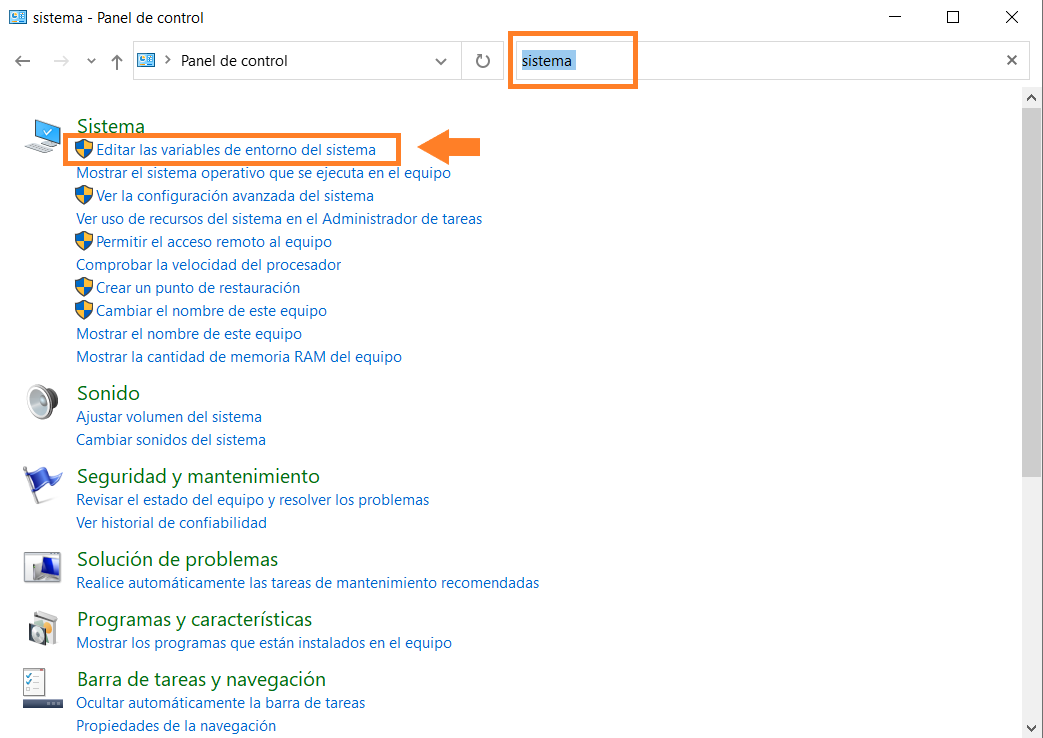
Inside the Control Panel window, search for “system” in the search box and click on “Edit the system environment variables.”
A “System Properties” window will open. Go to the “Advanced” tab and select the “Environment Variables…” button.

Once inside the “Environment Variables” window, in the “System Variables” section, select “New.”

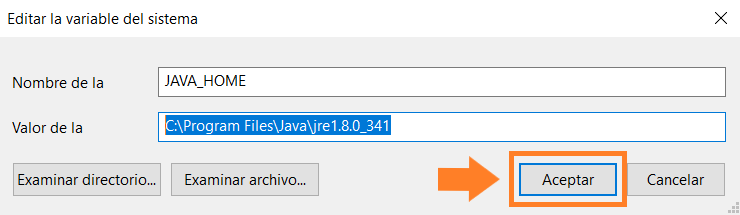
A new window will open where you need to enter the name and value of the new variable.
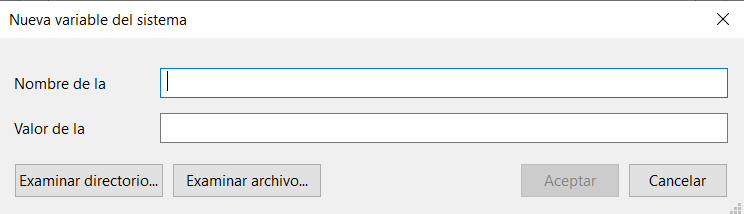
In the “Variable Name” field, type “JAVA_HOME.” For the “Variable Value” field, enter the full path on your computer to the Java application program folder. In our case, this path is “C:\Program Files\Java\jre1.8.0_341.” Once both fields are filled, click “OK” and exit the Control Panel window.
NOTE: If you’re unsure how to find this location, open Windows Explorer and navigate to your local disk. From the local disk, search in the Program Files folder and the Program Files (x86) folder until you find the Java folder. Open the Java folder, then open the program folder (most likely starting with jre). Once inside that folder, select the address shown in the location directory box and copy that text into the “Variable Value” field. Finally, click “OK” and exit the Control Panel window.
Step 7: Run the dbsetup.bat Tool
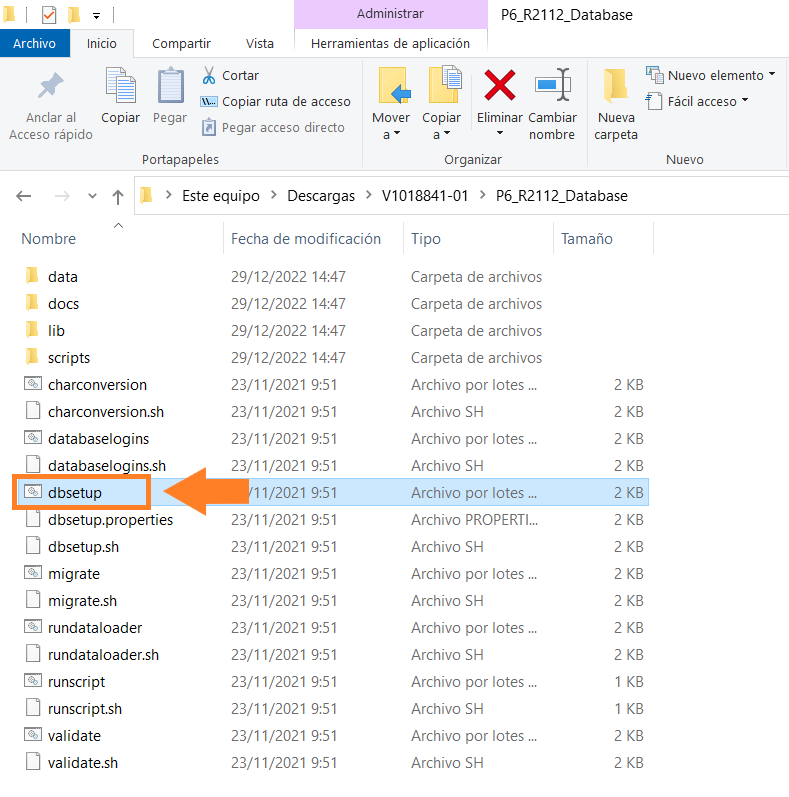
We are now just two steps away from completing the configuration of a Microsoft SQL Server Database for Primavera P6. It’s time to work with the Primavera P6 Database Configuration Tool. To do this, go to the folder where you extracted the files in Step 4 and double-click the “dbsetup.bat” file.
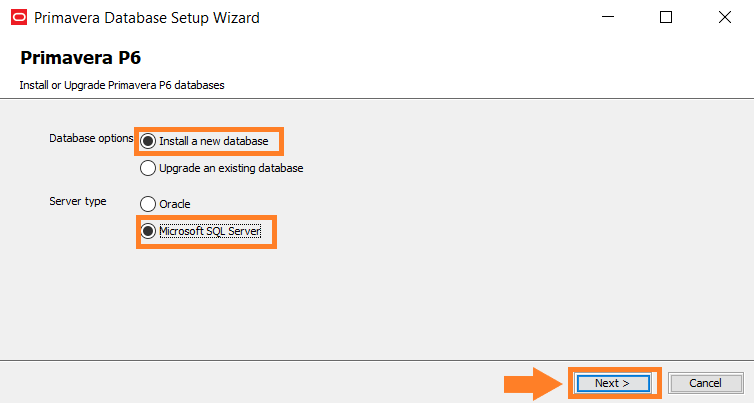
The “Primavera Database Setup Wizard” will open, allowing you to begin the process of configuring the new database. In “Database options,” select “Install a new database,” and in “Server Type,” select “Microsoft SQL Server.” Click “Next” to move to the “Connection Information” screen.
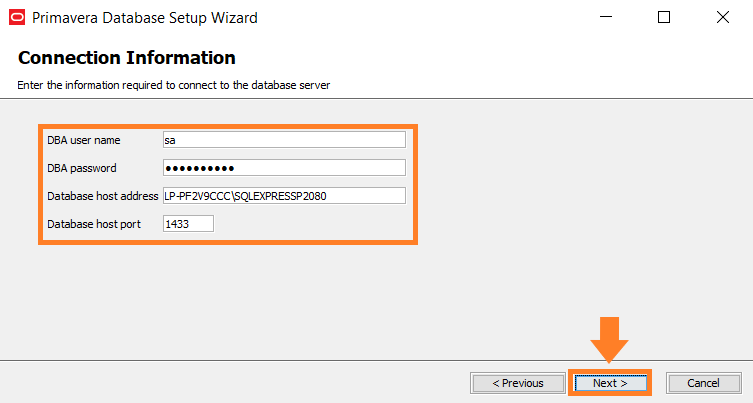
In this screen, you will need to add the username and password you specified during your SQL Server setup (see Step 1). By default, the “DBA user name” is “sa” (Server Administrator), and you should leave it as is. For the “DBA password” field, enter the password you selected during Step 1 of the SQL Server creation process. Regarding the “Database host address” field, enter the address you created earlier. Typically, this address will be “computer name\SQLExpress” if you used the default name. If you changed the instance name during creation, the address will be “computer name\instance name.” The “Database host port” field will automatically populate with the value “1433.”
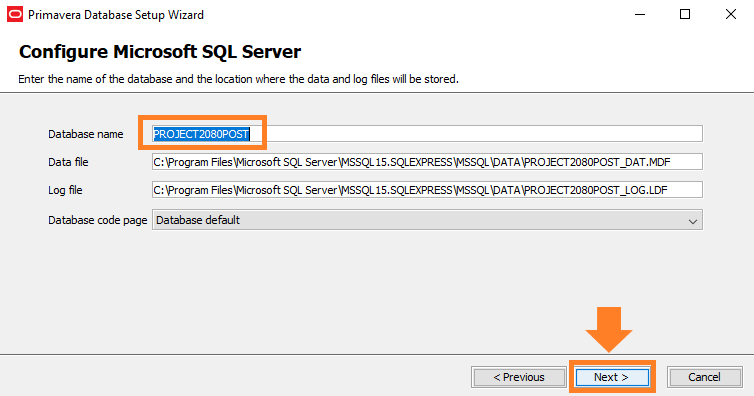
In the next window (“Configure Microsoft SQL Server”), you will need to choose a name for your database and enter it in the “Database name” field. We will choose the name “PROJECT2080POST.” Regarding the “Data” and “Log” files, they will be created in the folder where SQL Server Express is located. Press “Next” to proceed.
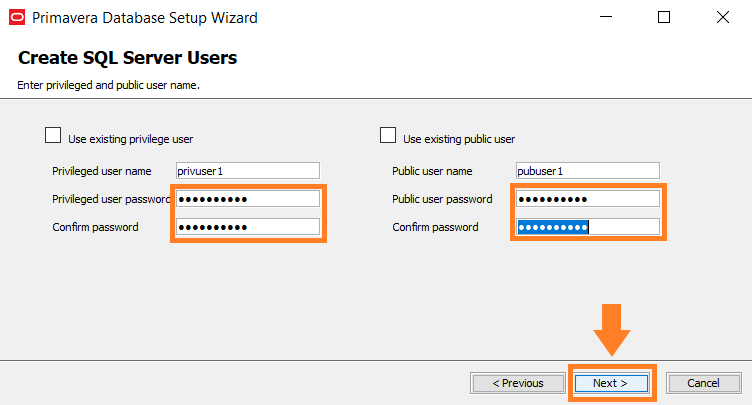
We have now reached the “Create SQL Server Users” window, where we will create two types of users: one public and one with privileges. We will leave the default usernames and only add a password for each of them. Once Primavera P6 is connected to the database, you can add additional users, so we recommend leaving these two users as they are for now. NOTE: Take note of these usernames and their passwords as you will need them to connect to the Primavera P6 Professional database. Click “Next” to continue.
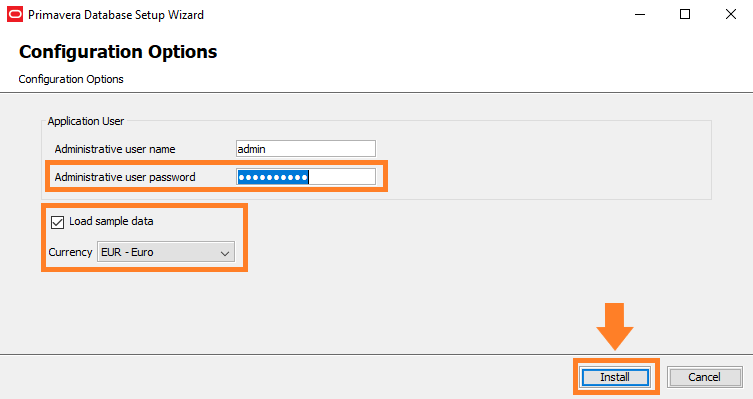
The next window is for configuration options or “Configuration Options.” It’s time to create an administrator username and password to log in. We will use the default username (“admin”) and a password. NOTE: Take note of this new username and password as you will need them to access Primavera P6.
This window also gives you the option to load sample data. This includes projects, resources, calendars, and other data, both global and project-specific. If you are new to using this powerful Project Planning and Control tool, we recommend loading all of this data and keeping this checkbox selected.
Lastly, it also allows you to choose the currency Primavera P6 will use by default. In our case, we will choose the euro.
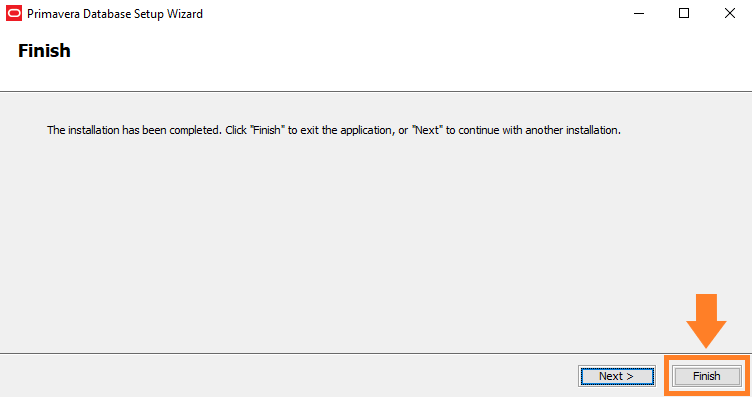
Press “Install” to complete the database setup wizard.
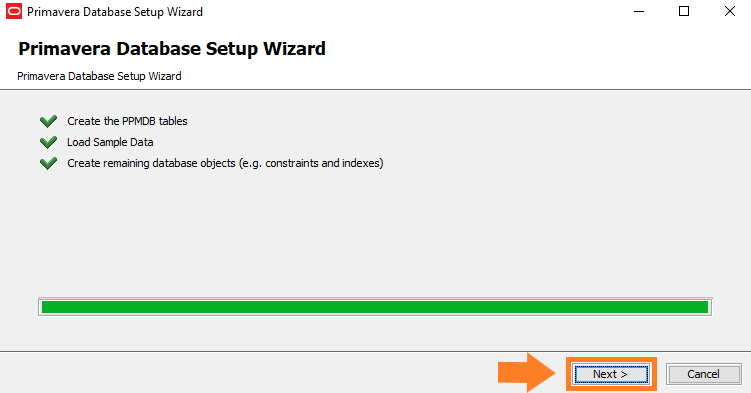
The database setup wizard will now begin creating your new database. If you selected the “Load sample data” checkbox, the process will take a few more minutes to complete. Once the creation process is complete, select “Next” and then “Finish” to exit the application.
Step 8: Connect Your Primavera P6 Professional (Client Version) to the Database
We are almost at the end of this long journey—a journey that will make your daily life as a project planner and project controller much easier. We have now created a new Primavera P6 database on a Microsoft SQL Server. Next, you need to connect the Primavera P6 Professional project planning and control software to this new database to start using it. Now, you must choose one of the following two options: Option 1 if you don’t yet have P6 installed on your computer, or Option 2 if you already have Primavera P6 installed.
Option 1: If You Don’t Have Primavera P6 Professional Installed on Your Computer
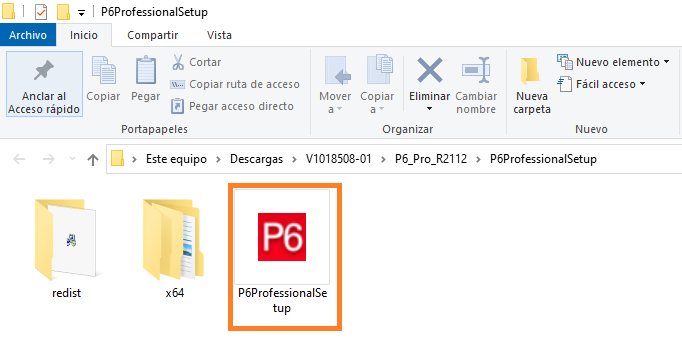
Let’s go to our beloved “Downloads” folder. Remember that when we downloaded the Primavera P6 Professional packages, four files were downloaded. One of them was used for database configuration, another for API integration, another contained software documentation, and the last one referred to the application itself. In our case, the file containing the application is “V1018508-01.zip.” Once you’ve unzipped and extracted all the files, you will see a folder named “P6_Pro_R2112” (depending on the version you downloaded, the folder name might differ: P6_Pro_XXXXX).
Open the folder you just unzipped and navigate to the “P6ProfessionalSetup” subfolder. Inside, you will find the executable file “P6ProfessionalSetup.exe.” Double-click it to run the installer.
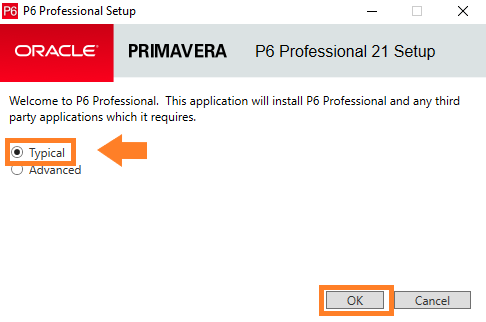
Select the “Typical” option and press “OK.”
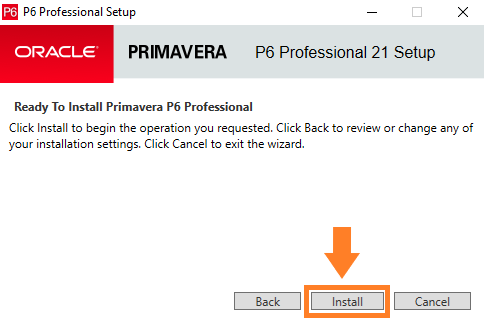
Next, select “Install.”
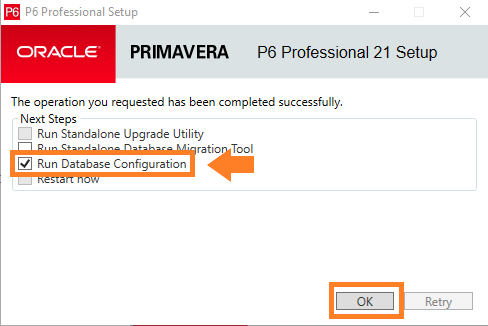
On the next screen, select “Run Database Configuration,” which is the default option, and press “OK” to open the Database Configuration window.
Option 2: If You Already Have Primavera P6 Professional Installed on Your Computer
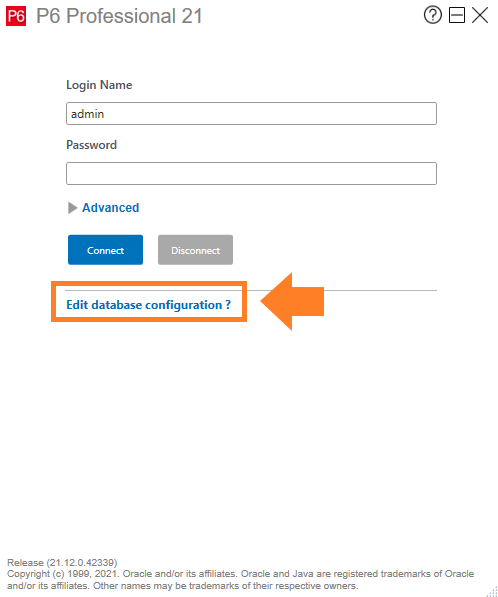
If you already have Primavera P6 installed on your computer, you can access the database configuration when you open Primavera P6 Professional and select the “Edit database configuration” link.
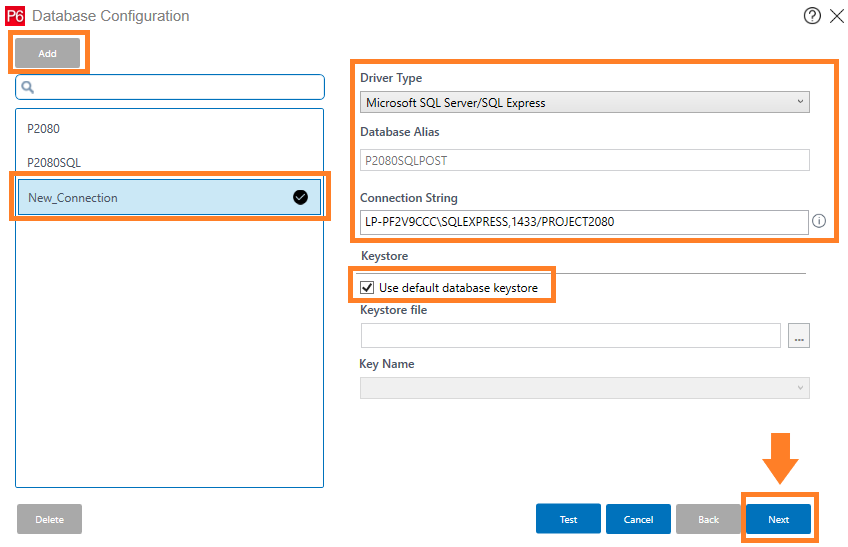
Whether you chose Option 1 or Option 2, the “Database Configuration” window will have opened. Select the “Add” button to add a new database.
Make sure you have selected “Microsoft SQL Server/SQL Express” as the “Driver Type.” For the “Database Alias” field, enter the name you want the database to be called. We have chosen “P2080SQLPOST.” For the “Connection String” field, it will typically be “Computer Name/Database Name.” However, in our case, we need to reference port 1433 and the database we created (in this exercise, we chose the database named “PROJECT2080”).
To finish, select the “Use default database keystore” checkbox and press “Next” to continue.
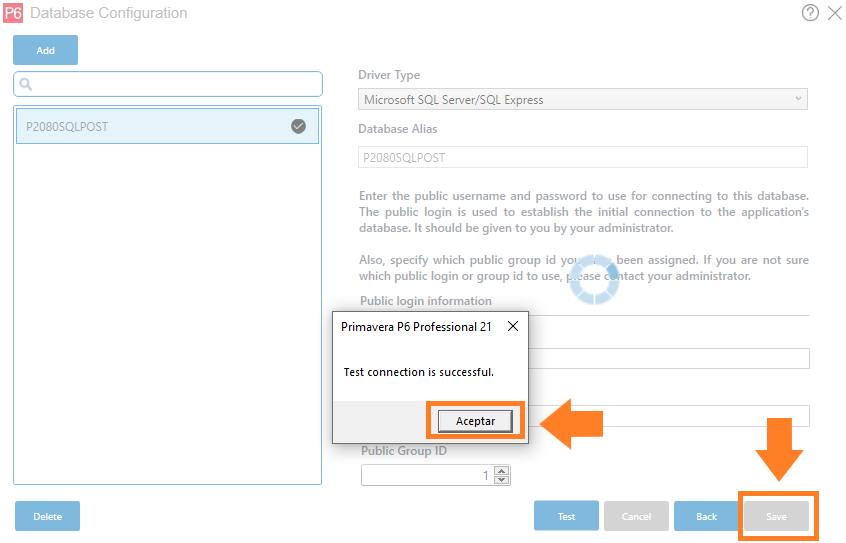
In the next window, add the public access information you noted in Step 7. This includes the User (if you kept the default user, this will be “pubuser”) and the Password you created for that user. Keep the number 1 as the “Public Group ID” and press the “Test” button to verify the connection.
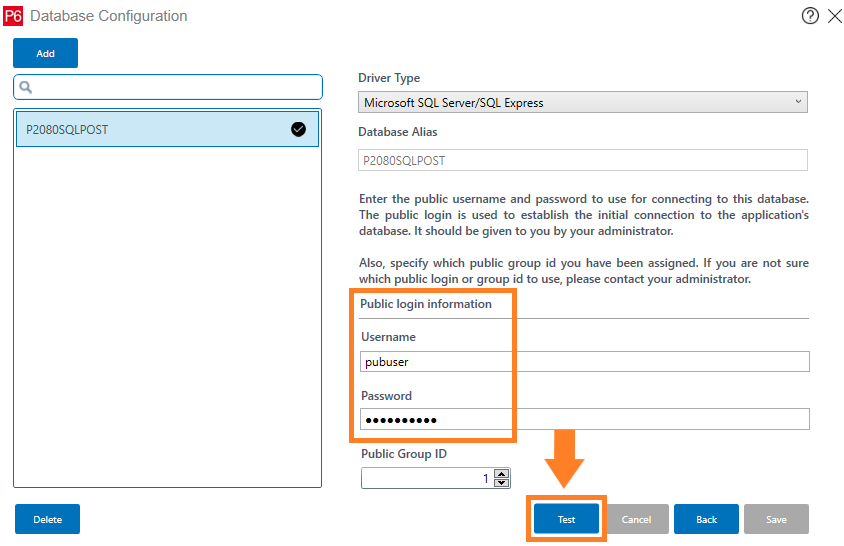
A message indicating a successful test (“Test connection is successful”) should then appear. Click the “OK” button to proceed and then the “Save” button to finalize.
At this point, you will have successfully created an SQL Server database and connected it to Primavera P6 Professional.
Access Your New Primavera P6 Database in Microsoft SQL Server
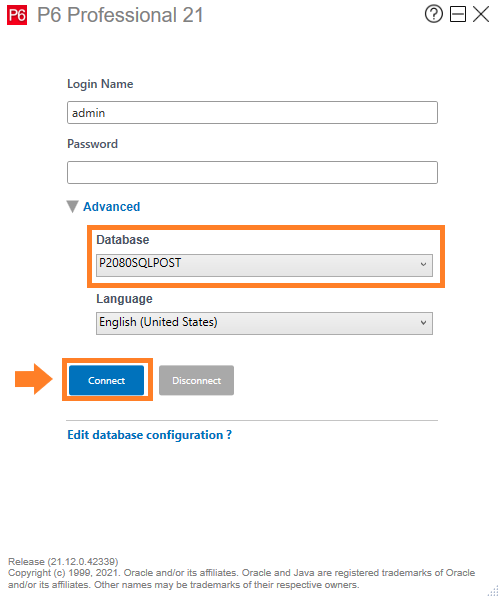
Now it’s time to make the most of Primavera P6. Log in to Primavera P6 Professional and select the database you just created. Open Primavera P6 Professional and log in using the administrative credentials you set up and noted in Step 7.
Expand the “Advanced” tab, and in “Database,” make sure to select the database you just created (in our case: “P2080SQLPOST”).
It’s time to click the “Connect” button, and you will now be inside Primavera P6 Professional and connected to a Microsoft SQL Server database. Congratulations!!

AT PROJECT 2080, WE’D LIKE YOU TO REMEMBER
We know this article on how to configure a Microsoft SQL Server Database for Primavera P6 is going to mark a turning point for you. From now on, a new world opens up where you will have full access to every table, column, and record in your Primavera P6 Professional database. Get ready, because soon you’ll be able to enjoy new articles on integrating Primavera P6 with Power BI and Python. We’ll start applying Data Science and Deep Learning to Project Planning and Control, and we don’t want you to miss it. So, if you haven’t done so yet:
SUBSCRIBE TO OUR YOUTUBE CHANNEL