Primavera P6 Professional Version 20.12 is released
Perhaps this is the biggest update in recent times that Oracle has made of this Planning & Project Controls software. Many of us have been the ones who were crying out for the Oracle tool to update some of its functions. In this post, we are going to tell you about the 8 features of the new Primavera P6 Professional version 20.12 that will improve your control over the project schedules you are working on. Are you ready?
SUBSCRIBE TO OUR YOUTUBE CHANNEL
8 new features of Primavera P6 Professional Version 20.12
Version 20.12 of Primavera P6 brings us new features. New features range from the configuration of the database to the resource assignment screen of our activity schedule.
Database configuration
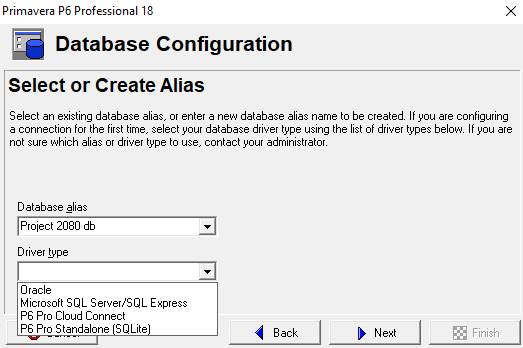
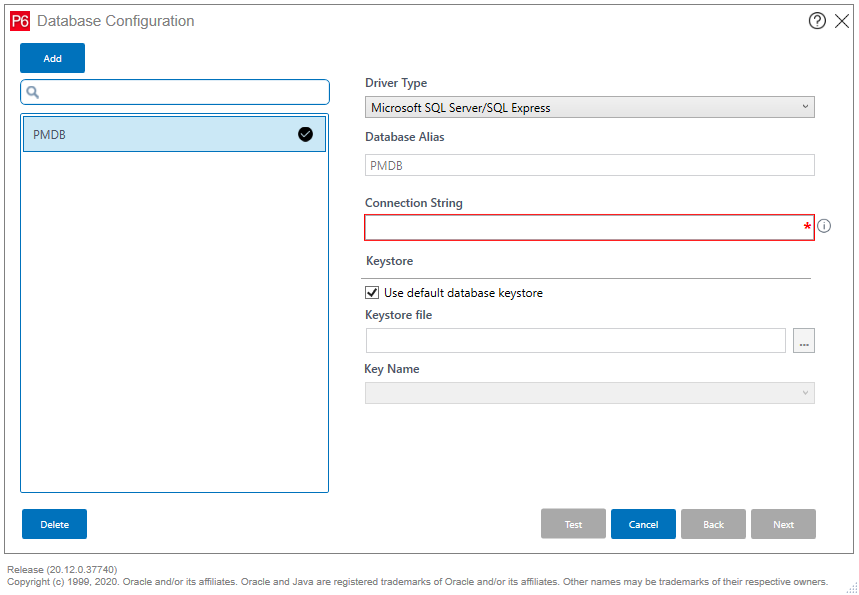
One of the first new features of Primavera P6 Professional Version 20.12 is the database configuration wizard. Until version 19 of Primavera P6, this assistant has not had any major updates. However, version 20.12 of Primavera P6 brings us a much more intuitive and easy-to-use database configuration wizard when configuring the connection to the database, especially useful for SQL connections. Below, you can see and compare for yourself the version 18 wizard with that of version 20.12 of Primavera P6:
From our point of view, the big difference in this new wizard is the need to include an input in <server>/<instance>\<database_name> format to connect to the SQL database. To learn more about SQL databases, you can read our post about how to connect Primavera P6 database with Power BI.
Primavera P6 Home Screen Changes
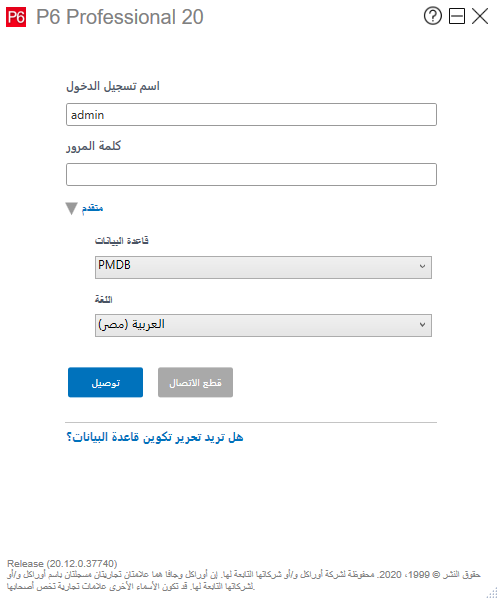
It is not a change as such. However, we want to point out that Arabic has been included as a new language. Surely one of the reasons why Oracle has included the Arabic language as one of the languages available in this new version of Primavera P6 Professional is the increase in the number of Arab users of this great planning and project controls tool. The Arabic world is a key part of the Project Management industry, with a large number of strategic projects worldwide. Without a doubt, a great novelty for Primavera P6.
SUBSCRIBE TO OUR YOUTUBE CHANNEL
Add comments to relationships in Primavera P6 Professional version 20.12
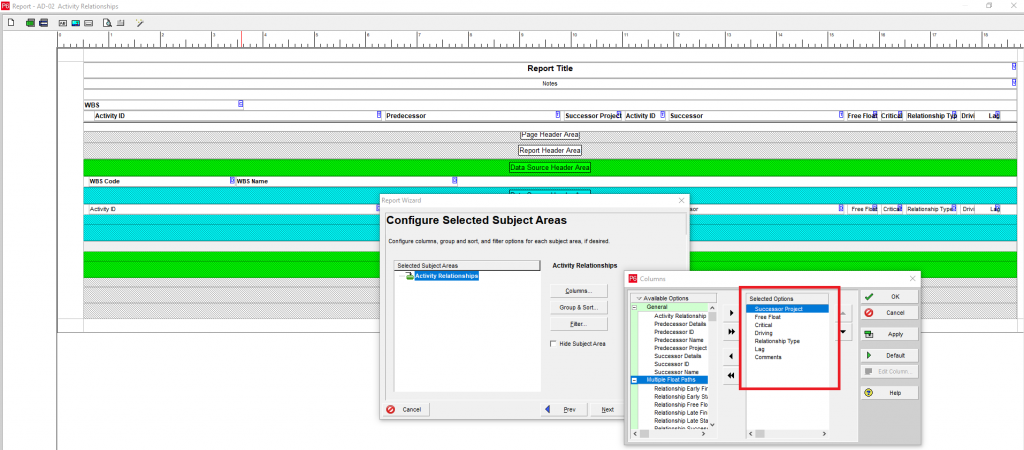
For those of us who already have experience using the Primavera P6 Professional tool, this is one of the most important new features of Primavera P6 Professional Version 20.12. It has been years of waiting, but we now have the option of adding comments to the different activities that we relate to each other. Oracle has created a new field called “Comments” that we can add in the “Relationships”, “Predecessors” and “Successors” tab.
Thanks to this new text field together with the rest of the data of the predecessor or successor activities, we can add relevant information. This information will help us to identify the reason for a certain “lag” used, or why we have chosen one relationship and not another. In other words, we now have an option whose added value is also reflected when preparing reports for our organization. Next, we show you how the “Comments” column of our relationships between activities can be displayed when creating a new report thanks to the report creation wizard offered by Primavera P6 Professional in its version 20.12:
Now our working programs in Primavera P6 will have greater transparency thanks to the 250 characters that we can add in the “Comments” box.
New options in the activity schedule calculation window
Whether you are a project planner with a large portfolio of projects, or if you work within a megaproject with a multitude of sub-programs of activities, you will not remain indifferent when you see these new options offered by the calculation window of the program. activities in Primavera P6 version 20.12.
Calculation options for multiple projects
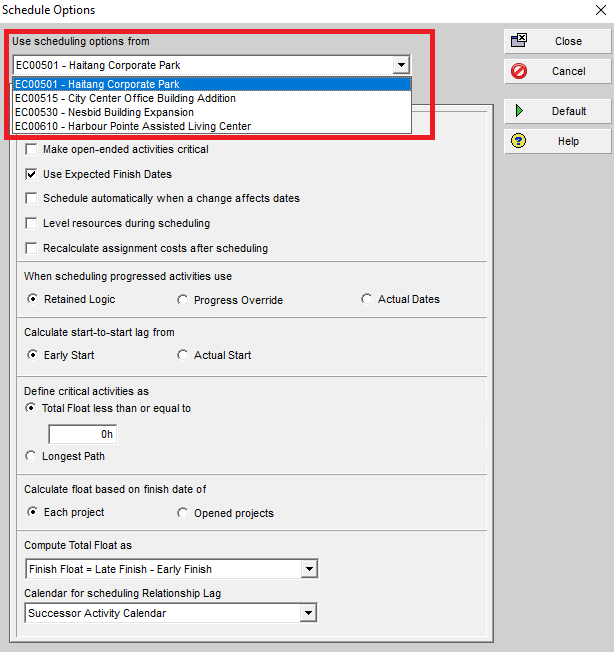
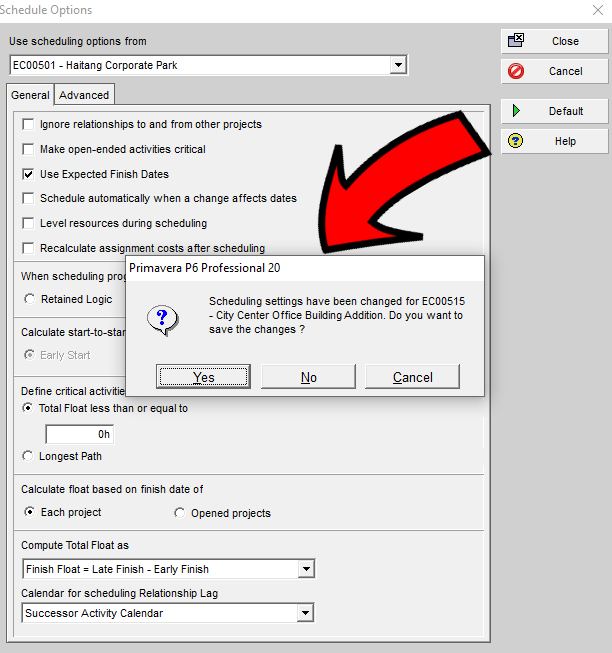
This is one of the most important new features of Primavera P6 Professional version 20.12 from our point of view. Primavera P6 will save the options that we define in the schedule options window (“Schedule Options” in the calculation window) independently for each of the projects that we have in our database.
Once we select one of the projects that we have opened, we will have the option to change its calculation options configuration and save the changes, as shown in the following screenshot:
Calculate multiple projects at once
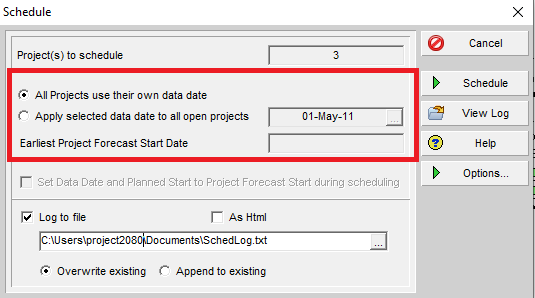
This new functionality brought to us by the new version 20.12 of Primavera P6 Professional is already known to users of Primavera P6 EPPM. This new option appears in the project’s “Schedule” calculation window when we press F9 on our keyboard. Its name is “All Projects use their own data date”.
On many occasions we can be working on a megaproject that has been divided into different sub-projects that are managed independently, with different cut-off dates, depending on the needs of each of them. As you may already know, in previous versions of Primavera P6, when we calculated several projects at the same time, we got a warning notifying us that each project was calculated based on its own cut-off date or Data Date. In case we wanted all the projects to be calculated for a certain Data Date, we had to go to the projects window and change this date in the “Data Date” field so that we could then calculate all of them at the same time.
Now, in this new functionality of Primavera P6 Professional version 20.12, the software allows us to select what we want to do:
- calculate all the projects independently, taking into account the cut-off date or data date of each of them. This option maintains the previously established cut-off date for each project.
- perform the calculation based on a new cut-off date for all of them. This option will automatically modify the cut-off date that each of these projects had until then.
Now, the person in charge of the company’s planning will have greater control over each of the projects he manages. Control that includes all cut-off dates within a multi-project scenario.
“Log” file available in HTML
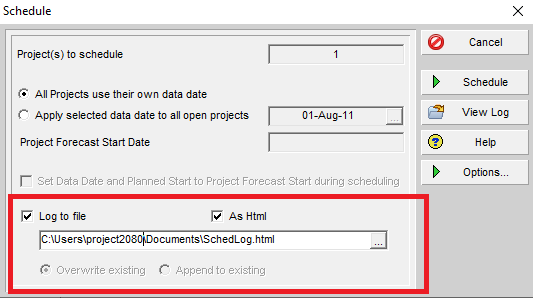
On this occasion, the calculation window of Primavera P6 version 20.12 offers us to save the “log” file in “.html” format and not only in “.txt” format. The advantage of saving this file in “.html” format is that we can open it in our browser, being a much more manageable format where we can expand and contract the different chapters of the file.
New codes available in Primavera P6 Professional version 20.12
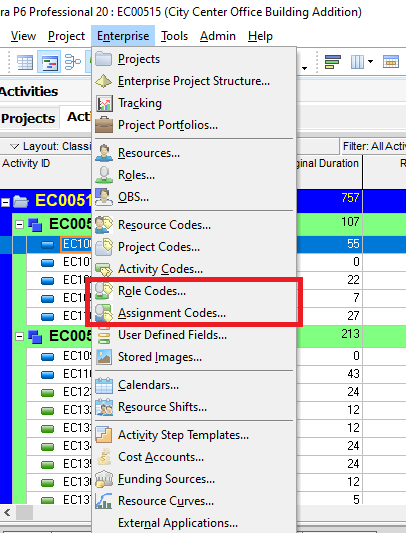
Previous versions of this project planning and project controls software already offered us the option of creating project codes, activity codes, and even resource codes to be able to use them when displaying the data of our activity schedule in different ways. . We even already had the option of creating custom fields thanks to the “User Defined Fields”. However, one of the great novelties of Primavera P6 Professional Version 20.12 is the inclusion of two new types of codes: resource assignment codes and role codes.
Specific codes for Resource Assignment: Assignment Codes
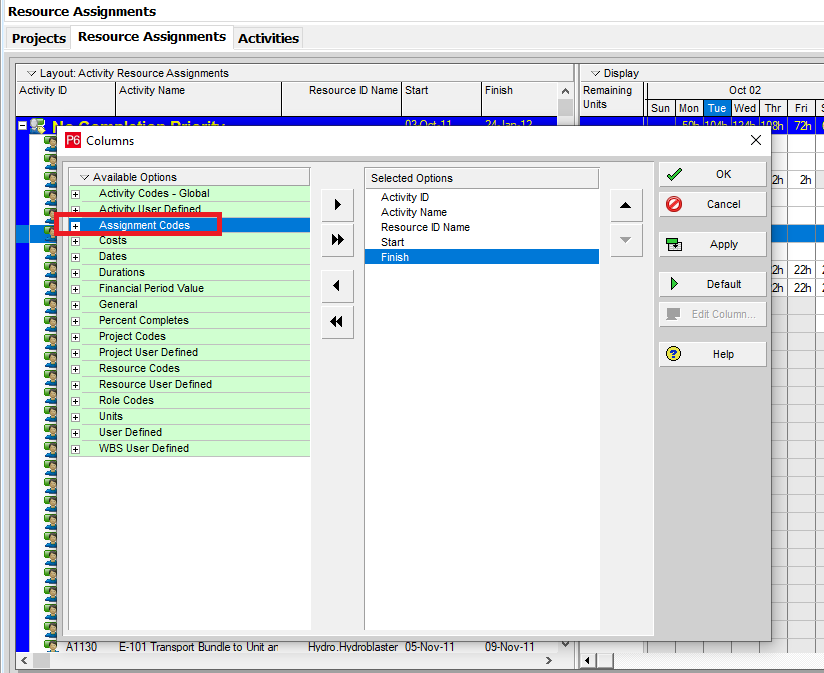
The new codes that have been created for the allocation of resources will help us to be able to order by categories, group, and analyze the allocation of resources that we do in P6 v20.12. Note that allocation codes are used at the global level, and not at the project level. That is why, when you are in the activities window or the projects window of Primavera P6, and you want to add new columns to your layout, these assignment codes will not appear in the options area. In other words, these codes are only available for viewing in the Primavera P6 Professional v20.12 resource allocation window.
When assigning them to each resource, the assignment can be made both from the resource assignment window and from the activities window. Within the activities window, in the activities detail area, we will see the “Resources” tab. Once we see the “Resources” tab, we can customize the columns that are displayed, including the different resource assignment codes or “Assignment Codes” that we have created. Once this is done, it will only be a matter of clicking on each of the fields and selecting the appropriate code for each resource.
Finally, these codes are eligible in the “Resource Assignment” window to be able to group our resource assignment by code. Also, remember that these codes are not present in the activities window or in the projects window. As you can see below, the User Defined Fields that in previous versions appeared under the “User Defined” column, are now shown under the corresponding category, such as “Activity User Defined”, “Project User Defined”, “Resource User Defined”. ” or “WBS User Defined”.
Specific codes for Roles: Role Codes
As for the role codes, they work in the same way as the Assignment Codes seen in the previous point. Therefore, in this post, we consider that the previous point covers everything necessary when we refer to Role Codes as a novelty in Primavera P6 version 20.12.
Calendars for financial periods
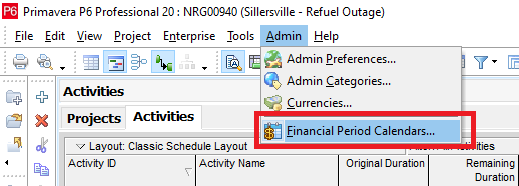
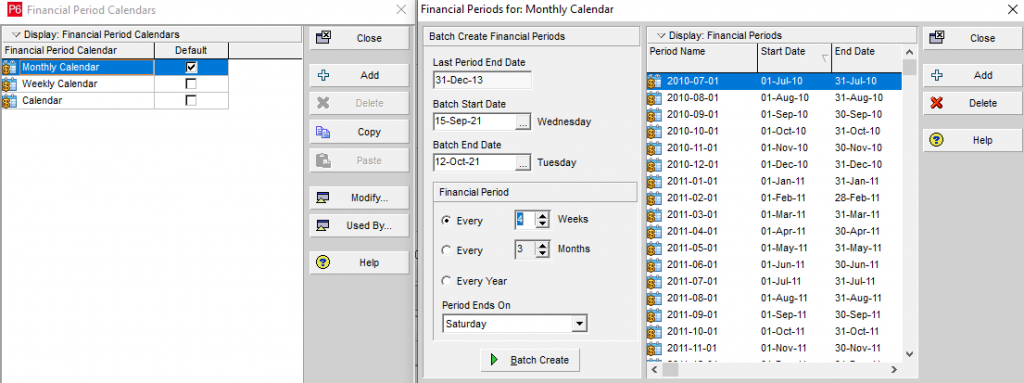
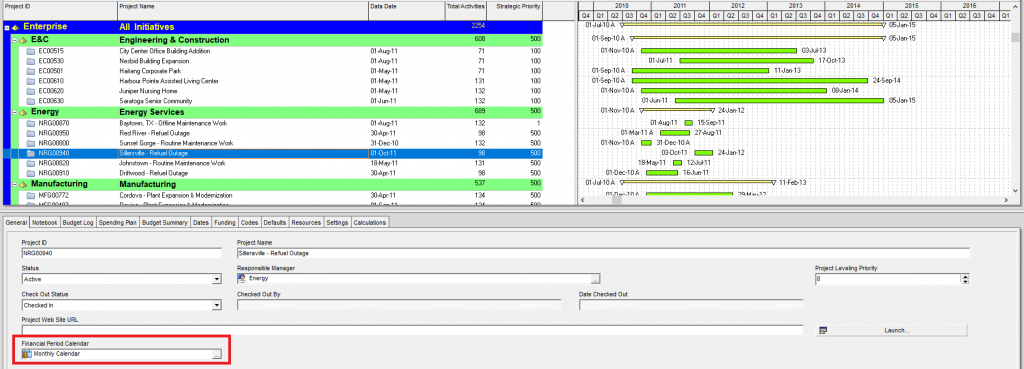
In this new version of Primavera P6, we also highlight the option of using different financial periods or Financial Periods in different projects. We will no longer have the problem of being limited in the use of financial periods in the event that we have some projects that are updated weekly and others that are updated periodically each month. In the new version 20.12 of Primavera P6 Professional, we are able to create different financial calendars. Calendars such as weekly, monthly, or any other temporary need in terms of work periods. Once created, we can assign each of them to our projects.
The creation of the different financial calendars is available through the Admin menu:
Once inside the “Financial Period Calendars” window we can create new calendars and modify them according to our needs, as shown in the following screenshot:
After having created the different financial periods for the monthly calendar, we will be able to assign them to our projects, periodically store the data related to resources and costs, and be able to view them in our activities window once we open the project.
Fill-Down and Fill-Across option in the “Resource Assignments” window
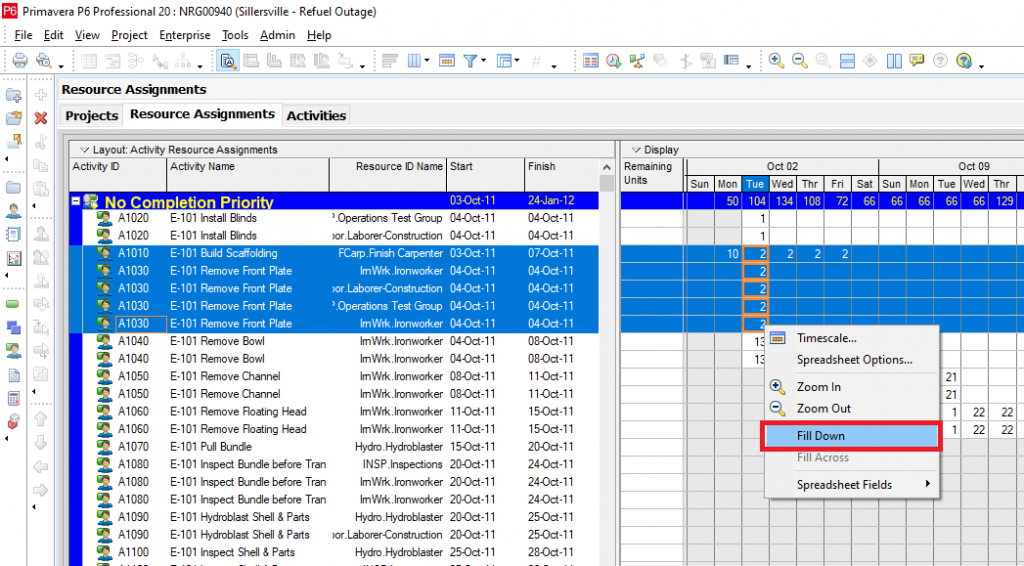
Another novelty in Primavera P6 Professional Version 20.12 is the option to automatically fill cells both vertically and horizontally. A filling option thanks to the use of “Fill Down” and “Fill Across”, in the resource allocation window. Below you can see an example of how we can use the Fill Down option. Simply by selecting several cells at the same time by pressing Shift on our keyboard and opening the drop-down menu with the right button of our mouse.
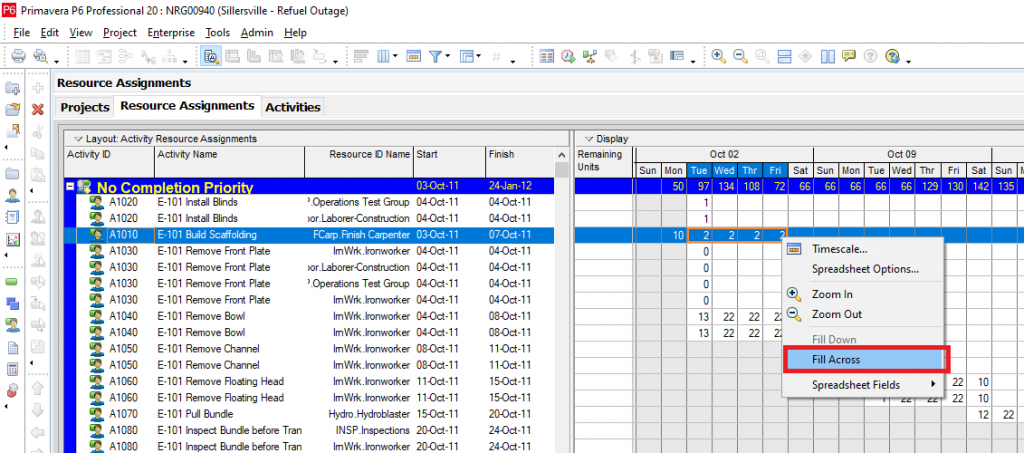
In order to carry out the “Fill Across” command, we would proceed in the same way.
The use of these two new functions in the resource allocation window of Primavera P6 version 20.12 can lead us to save time when we talk about large projects where there are constant returns of our resources over time. Below you can see a video where we explain how to carry out the Fill Down function in Primavera P6 Professional at the activity level:
Show exact values in histogram bars
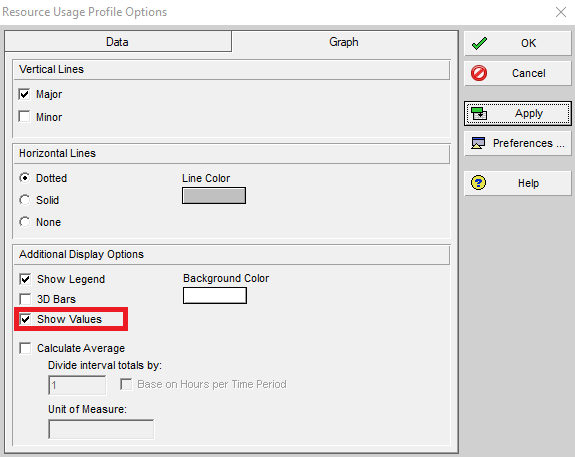
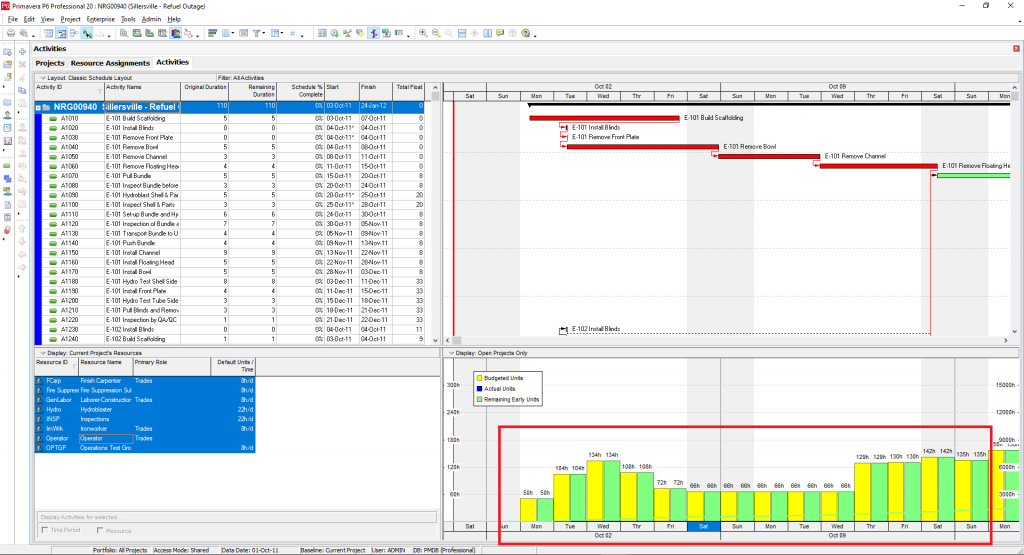
We have reached the end of this article about what’s new in Primavera P6 Professional Version 20.12. That is why we have left for the end one of the novelties that will have the greatest impact. An impact you will notice when preparing your periodic project planning and control reports. Now your histogram graphs will be able to show the values on the bars that are displayed thanks to the new “Show Values” option.
Once we select this option, we will be able to see the values above each of the bars of our graph, as seen below:
IN PROJECT 2080 WE WOULD LIKE YOU TO REMEMBER
We are facing one of the most important updates in recent years of this great project planning and control software. News that will save us time in our daily tasks as project planners. Functional improvements that will help us to have greater control of our project. The new features of Primavera P6 Version 20.12 will help all users to understand, control and monitor with greater detail and precision the project portfolio. Without a doubt, Primavera P6 Professional now adds a quality bonus that was lacking in previous versions.


