Connect the Primavera P6 XER file to Power BI
Having trouble connecting your Primavera P6 database with Power BI? Are you tired of connecting excel sheets with Power BI and wish you could save time? In this post, we are going to show you how to connect the Primavera P6 XER file to Power BI. To do this, you first need to understand what the XER file is, how we can open it thanks to a notepad or the Excel tool, the information these files give us, and in what format. Are you ready?
SUBSCRIBE TO OUR YOUTUBE CHANNEL
Why connect the Primavera P6 XER file with Power BI
The era of dynamic reports based on Business Intelligence and the massive crossing of different databases has opened a new path for us in the world of project planning and project control reports. Generating reports thanks to the data obtained from the Primavera P6 planning and project controls tool has never been an easier task. In the post we released about how to connect Primavera P6 with Power BI, we already taught you how to create reports in Power BI thanks to the connection with Excel sheets.
The use of excel spreadsheets is a process that, today, is certainly friendly for most users. However, it can become a process that generates errors more easily or is not 100% automatic. That’s why we think that working directly with XER files as data sources will save us a lot of manual work in the long run and greatly reduce the risks that come with working with manually created spreadsheets.
Before showing you how to connect the Primavera P6 XER file to Power BI, let’s see what’s behind the native XER file of this powerful project planning and control tool that is Primavera P6.
What to find in a Primavera P6 XER file
How is data stored in the Primavera P6 database
The Primavera P6 project planning tool database stores all data in more than 170 tables. Each of these tables contains different fields which in turn contain records. These tables are referenced to each other through relationships between a Primary Key and a Foreign Key. Despite the large number of tables that the Primavera P6 database contains, we should be more familiar with only 20 of them.
It should be noted that calculated fields are not stored in the Primavera database, since they are calculated based on other fields in the database.
Example of where data is written to the Primavera database
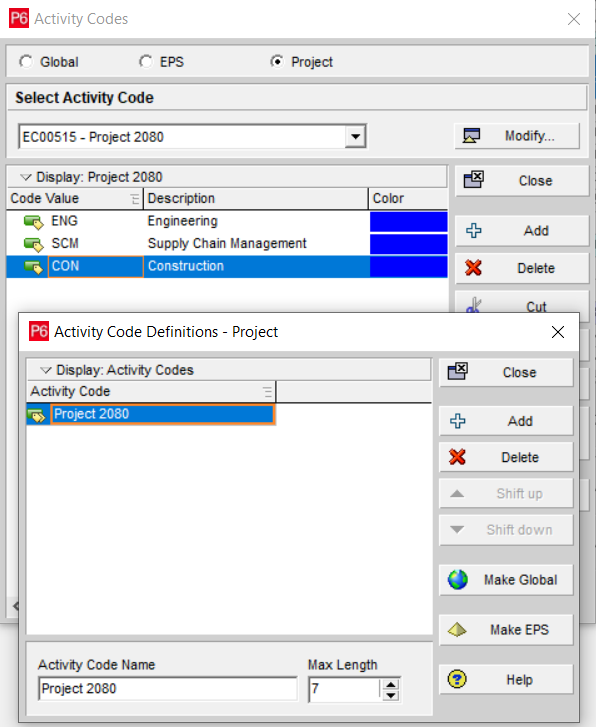
Next, we are going to see an example that shows how the data that we enter in P6 is stored within its database. To do this, we will base ourselves on the Activity Code called Project 2080.
The data is stored in the tables, fields, and records of the database, as we mentioned before. In this example, the Activity Code that we have called “Project 2080” is stored in the table (%T) “ACTVTYPE“, inside the field (%F) “actv_code_type_id“, with a unique code as a record (%R) of value “1986“. With the help of Excel, this is what it would look like:
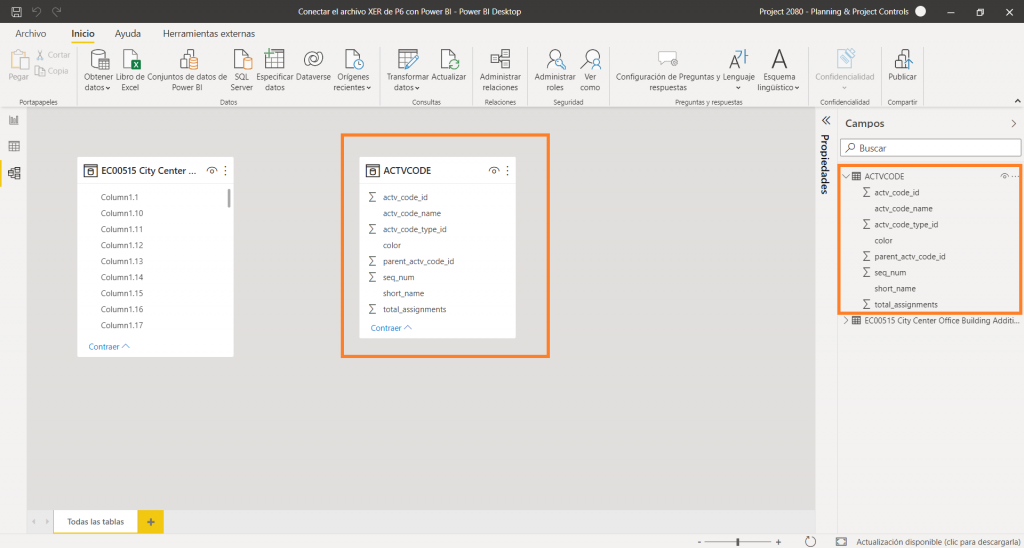
As for the different values within the Activity Code “Projet 2080“, these are stored within the table (%T) “ACTVCODE“, as shown in the following screenshot:
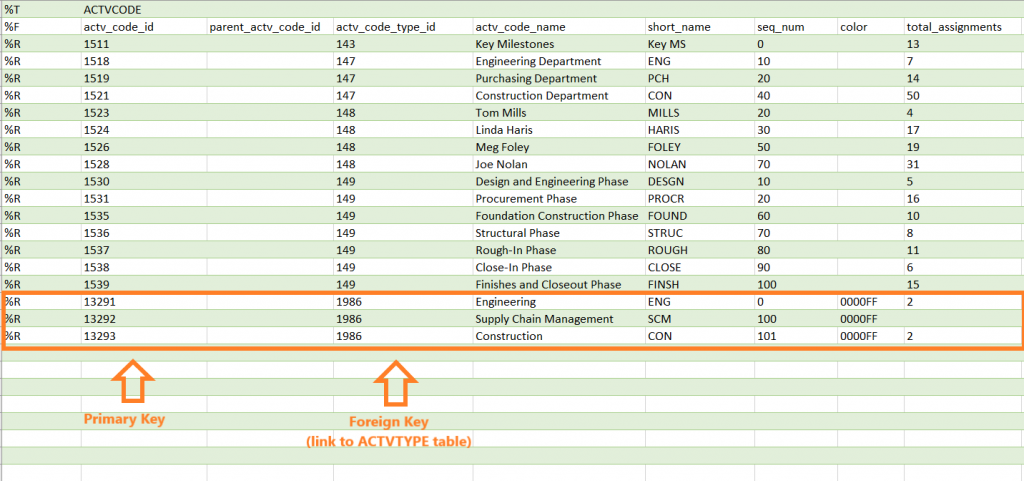 Note that the Primary Key in the ACTVTYPE table (1986) becomes the Foreign Key in the ACTVCODE table. This will make both tables related to each other, something that will help us when relating tables in Power BI.
What is Primavera P6 XER file
Primavera P6 is capable of working with different types of formats, such as XML, XLSX (Spread Sheet), or MPX (Microsoft Project) to exchange data related to project scheduling. However, the file that characterizes Primavera P6 is the XER file. The XER file is a CVS-type file, with tab delimiters (TAB). In other words, the XER file is a text file with tabulated data that you can open and modify in any text editor or other software that reads CVS files. Before moving on to work with the Primavera XER file in Power BI, let’s show you how you can open and view this file in Excel.
How to open and view an XER file in Excel
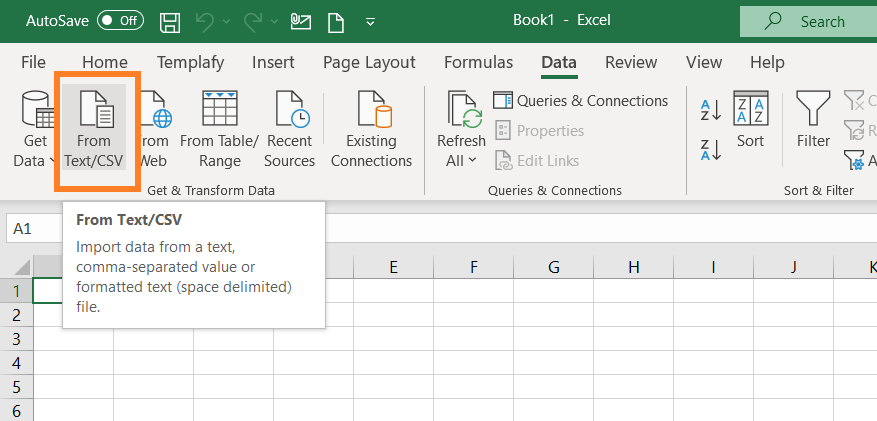
As it is a text file, the XER file can be opened using a note editor and even using the Excel tool, as we will see below, through the “From Text / CSV” option:
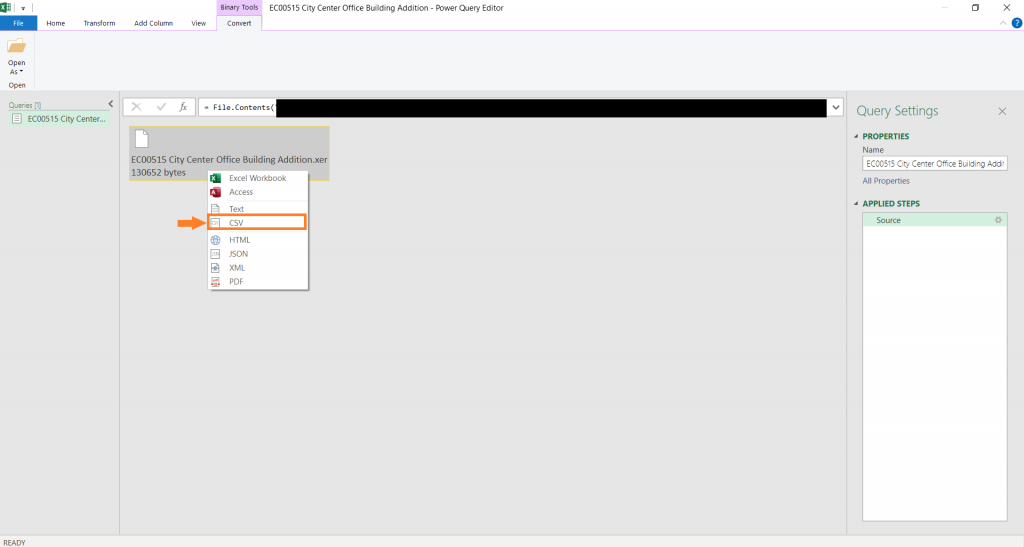
Once we have clicked on this option, we select the XER file that we want to import and a new window called “Power Query Editor” will open. Our file will appear in it, but still without format. To do this, we will select the file and press the right button of our mouse so that a drop-down appears where we will select the “CSV” option:
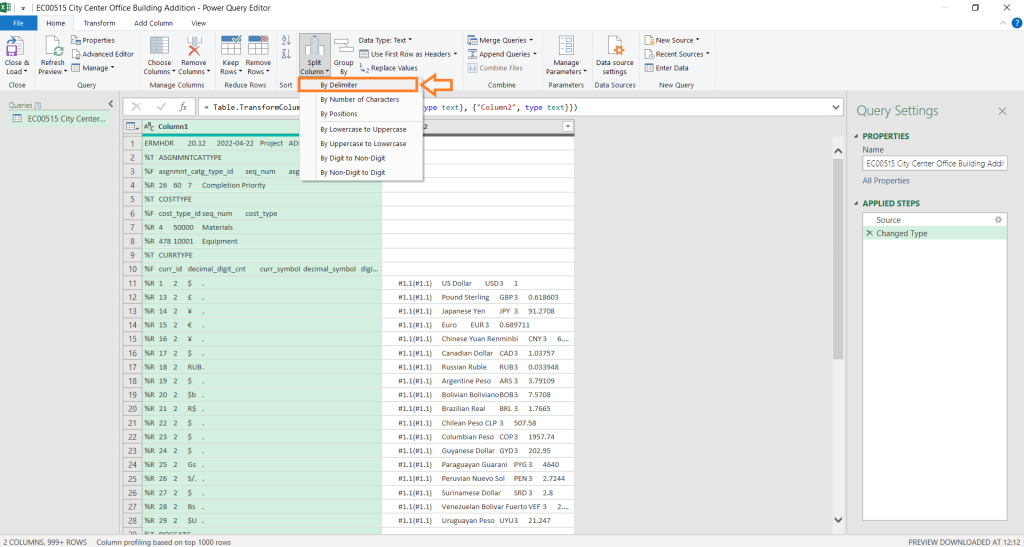
At this time, only two columns will appear. In order to see all the columns, we will use the property of the XER files, which we know are tabulated text files. We will go to the option to “split columns“, by delimiter:
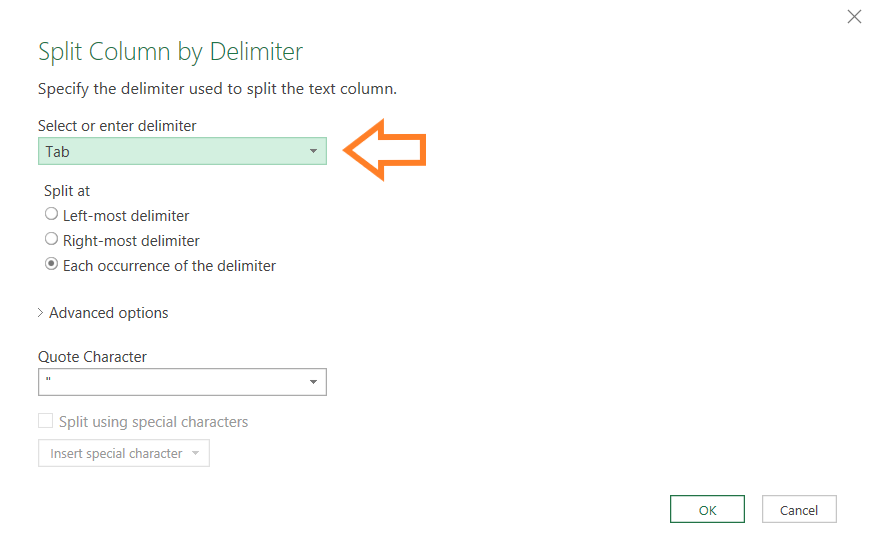
In the window that appears, we will select the “Tab” option as the delimiter, as shown below:
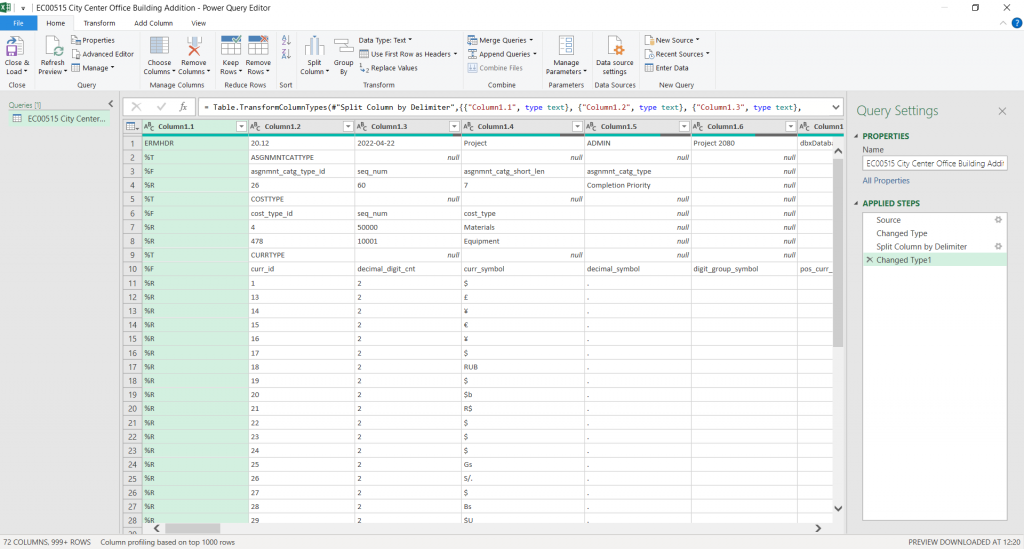
In the following image we can already see how all the columns that are part of the XER file that we export from Primavera P6 are shown:
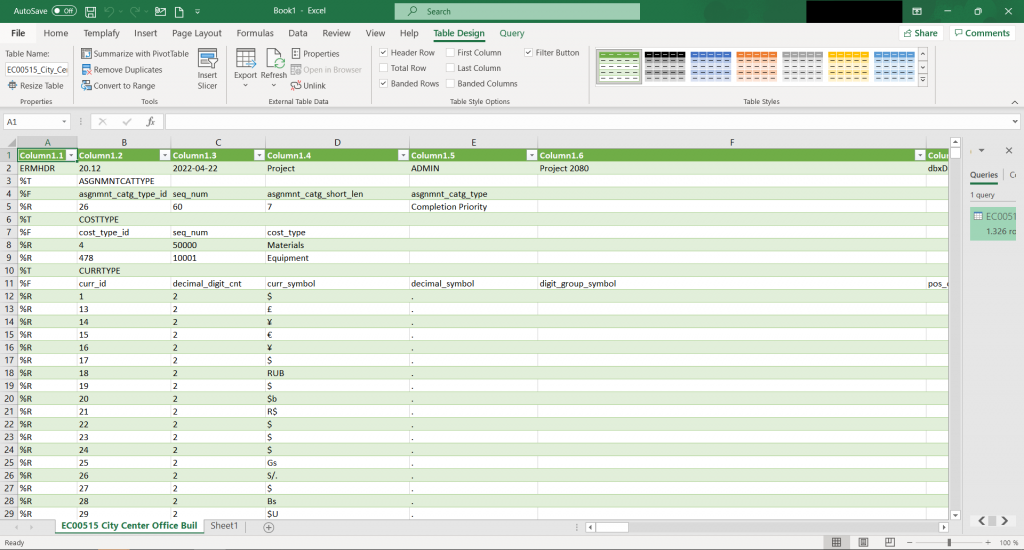
We can now click the Close and Load the file button in the upper left corner to be able to see the XER file as a single table in our Excel tool:
Before going on to see how to connect the Primavera P6 XER file to Power BI, we want to mention that this file always has the same structure, regardless of whether it is a file with data from one, two, or more projects. The structure is always the same and there are certain attributes of the table that are important to know before moving on to the next point.
If we look at the first column of the table that we have obtained when opening the XER file in Excel, we see that there are four attributes:
- %T: to refer to tables
- %F: to refer to fields
- %R: when referring to registers
- %E: refers to the last row of the XER file of P6
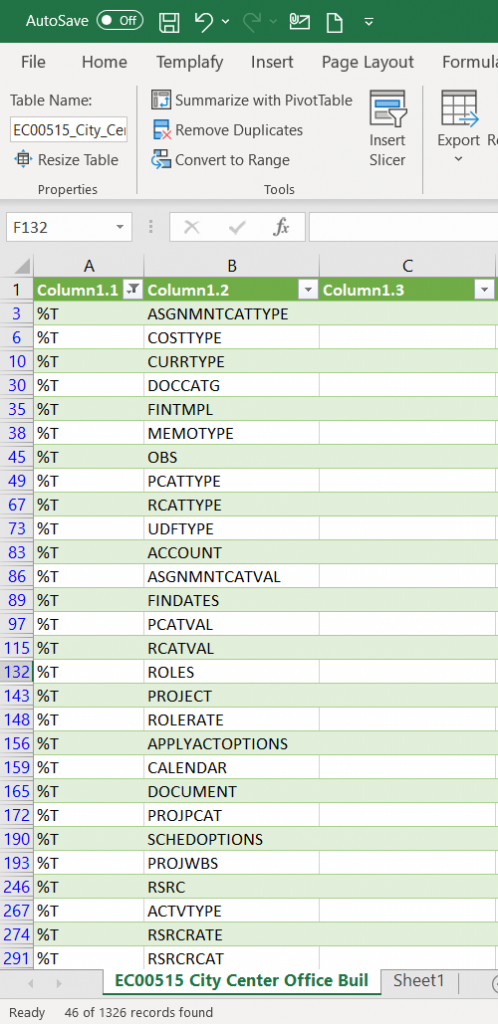
Therefore, if we want to know the list of tables that our native Primavera P6 file contains, we just have to filter the first column by “%T“:
How to connect Primavera P6 XER file to Power BI in 4 steps
If you’ve reached this point, we’re sure you already have a much deeper understanding of Primavera P6 XER files than you did before coming to this post. It’s time to put these insights into practice and start connecting your Primavera P6 XER files with Power BI. The objective is none other than to fully automate your reporting system and save as much time as possible month after month.
Step 1: Open Power BI
First, we will open Power BI and save the file with the appropriate name. In our case, we have called this file “connect Primavera P6 XER file with Power BI”.
Step 2: Export your Primavera P6 projects to XER format
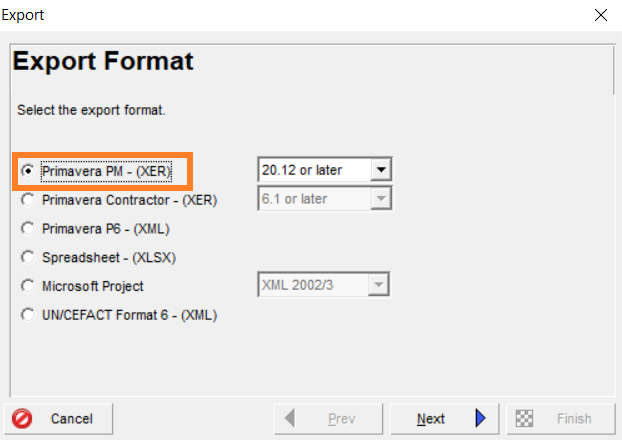
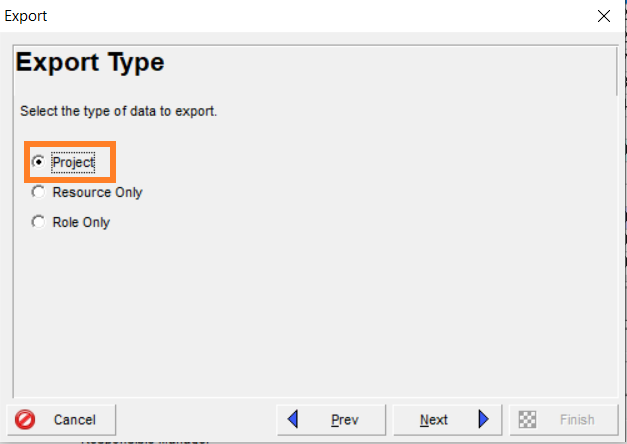
Next, already in Primavera P6, we will select and open those projects that interest us to generate our reports in Power BI. Once opened, we will export them in XER format. It is worth mentioning that there are up to three types of data to export: projects, only resources, or only roles. Selecting one or the other data set will only influence the number of tables that make up the XER file. For this article, we have chosen the option to export project data.
Step 3: Get the data from the XER file in Power BI
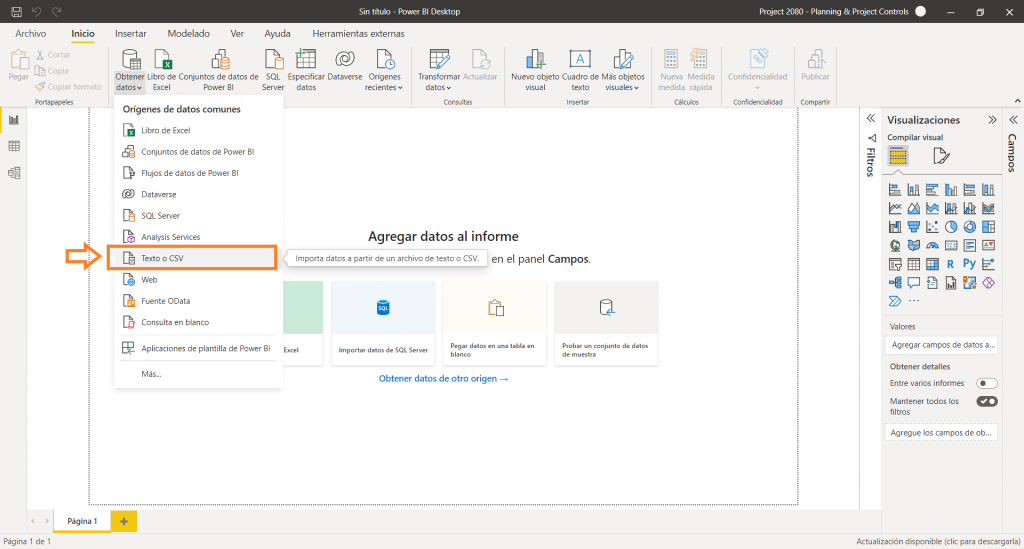
Back in Power BI, let’s start working with the XER file. We will import the data from the XER file into Power BI and work with it in the query editor. To do this, the first step is to import the XER text file. Click on “Get Data” and select the “Text or CVS” option. As they are files with a .XER extension, we must select the option to see “all files” and we will select the XER file that we have previously created.
The “Power Query Editor” will have opened, just as it happened before when we imported the file into Excel. We will follow exactly the same steps that we saw above when we talked about how to open and view an XER file in Excel (let’s refresh our memory: we must select the icon inside the “Power Query Editor” window, and with the right mouse button select the “CSV” option. At this time it will be transformed into a table with two columns. Next, we will select the first column (“Column 1”), and select HOME-Split Column-By Delimiter. We will select the “Tab” delimiter since the XER files are CSV-type files with TAB, and split at “each occurrence of the delimiter”). However, in this case we won’t hit the “Close and apply” button yet.
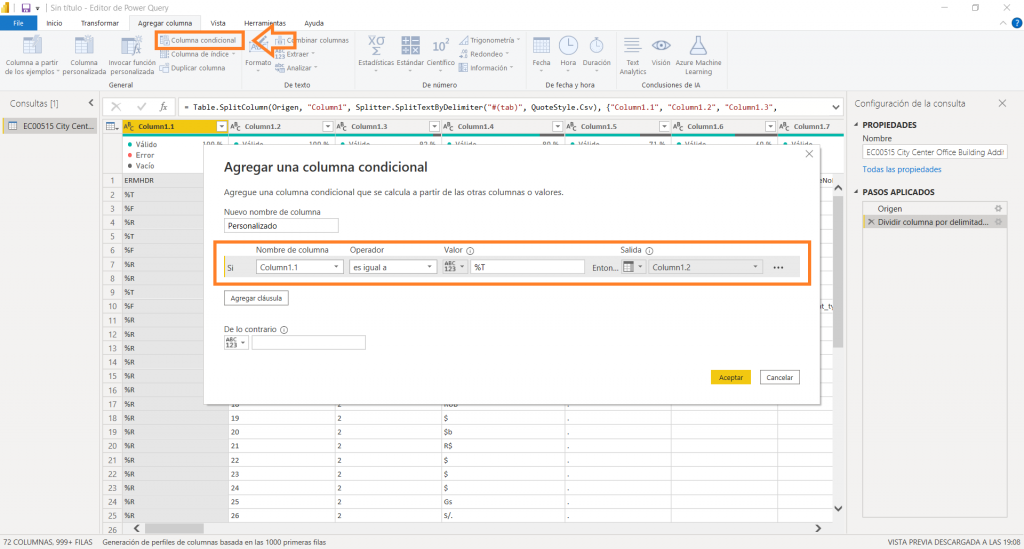
The second step consists of making a series of adjustments in this query. First, we will add a conditional column. The condition will be that if a %T appears in column 1.1, then it returns the name of the table that comes in Column 1.2:
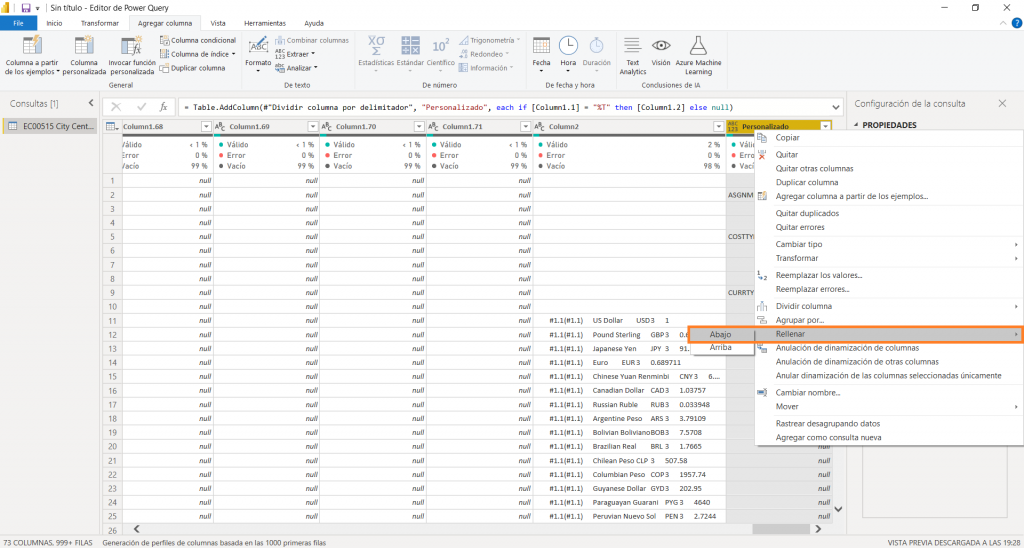
Once this new column is created, we will select it and go to Transform – Fill Down:
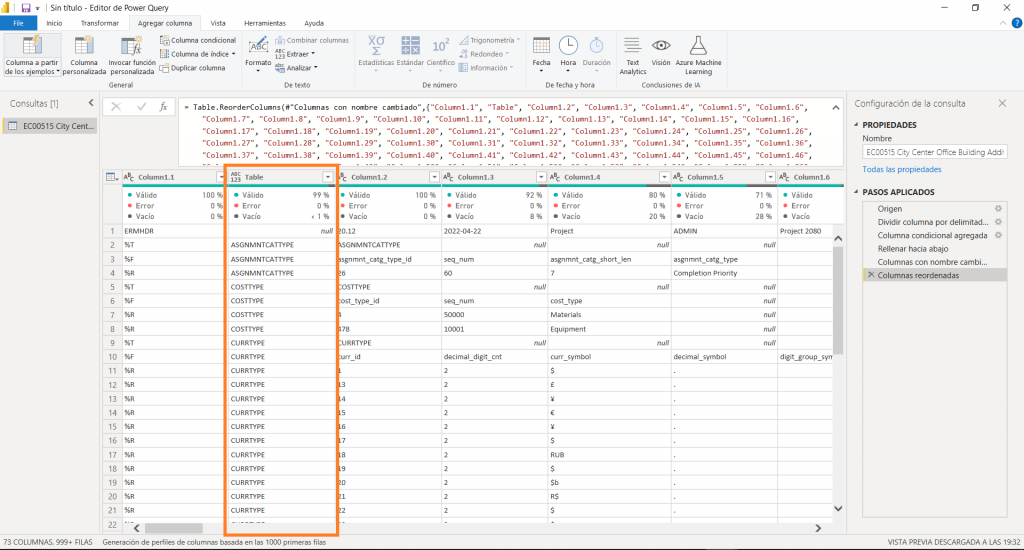
Next, we’ll move the column between Column 1.1 and Column 1.2 and name it “Table”:
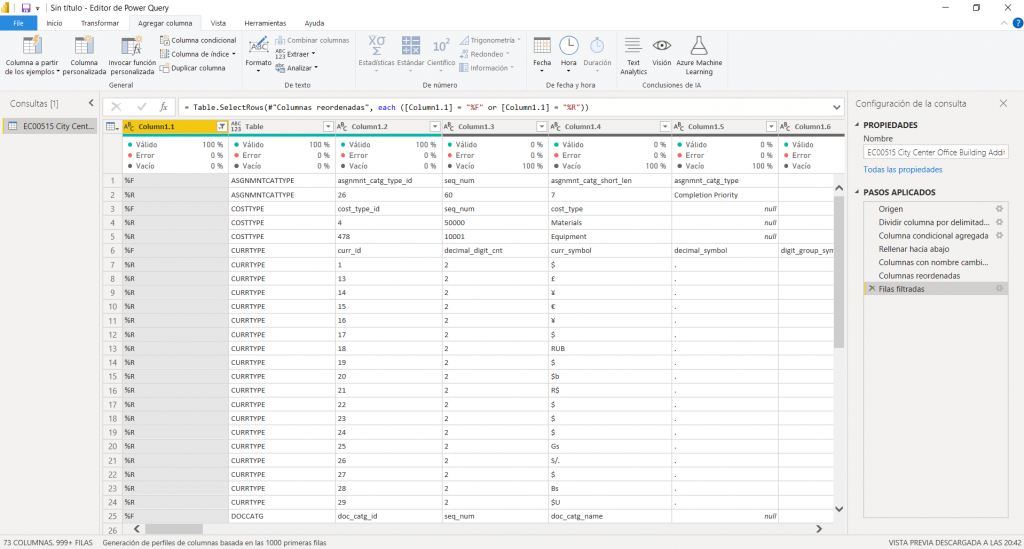
Lastly, we will filter Column 1.1, selecting everything except ERMHDR, %E, and %T:
Step 4: extract the tables from the XER file
In this step, we are going to start extracting tables, along with their particular fields and records. Since we don’t want this post to take longer than necessary, we are only going to extract the ACTVCODE table as an example. Once we know how to extract a table, the rest of the tables would be extracted in the same way, always using the same table from the XER file that we have exported from Primavera P6 as the data source.
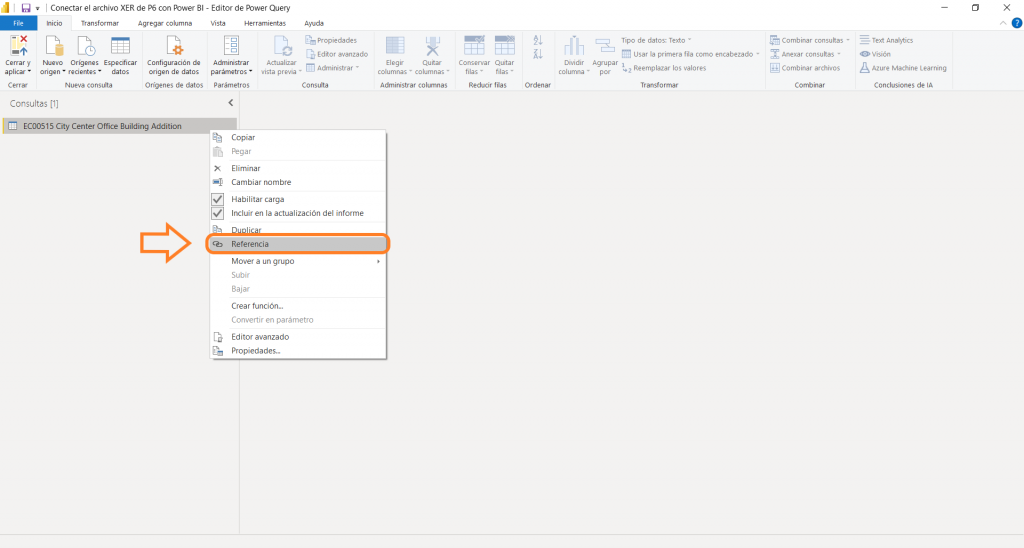
We’ll start by creating a reference to the XER file query we just created in the previous steps. To do this, we will select the original query and with the right mouse button we will select “Reference“. We will create as many references as tables of the XER files that we want to have at our disposal.
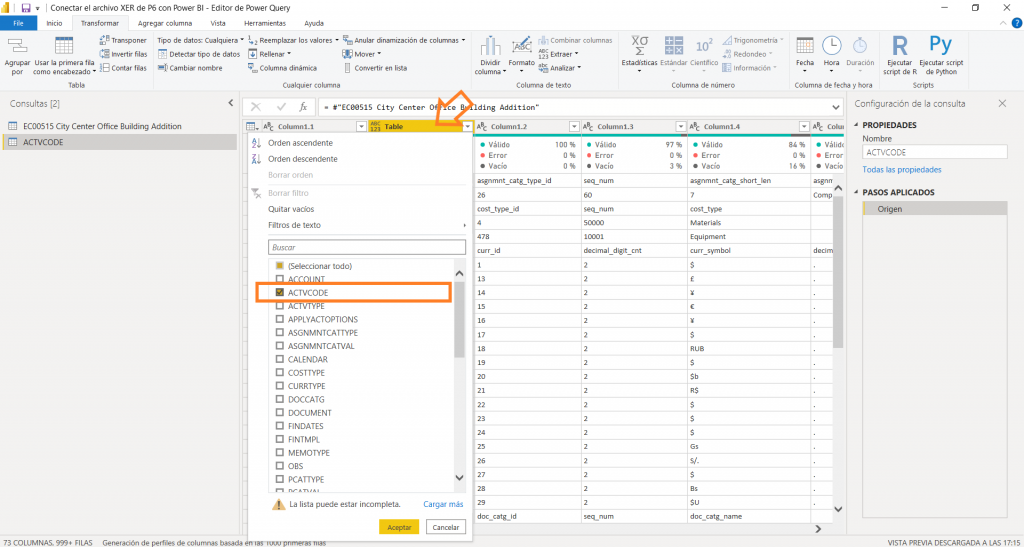
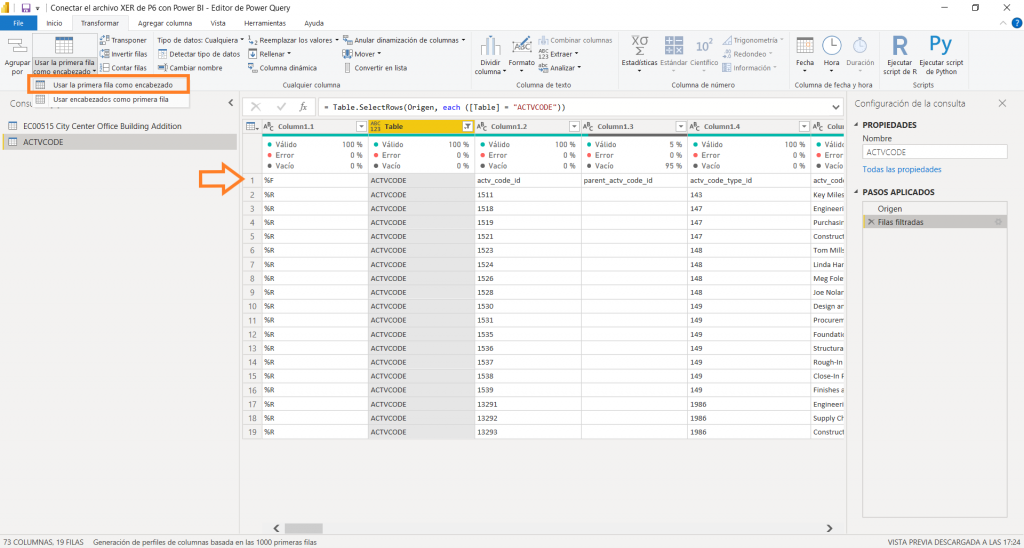
Once we rename this new query by the name of the table that we are going to create (in this case it would be ACTVCODE), we will filter the column that we call “Table” by the name of our table and we will select Transform – Use the first row as a header:
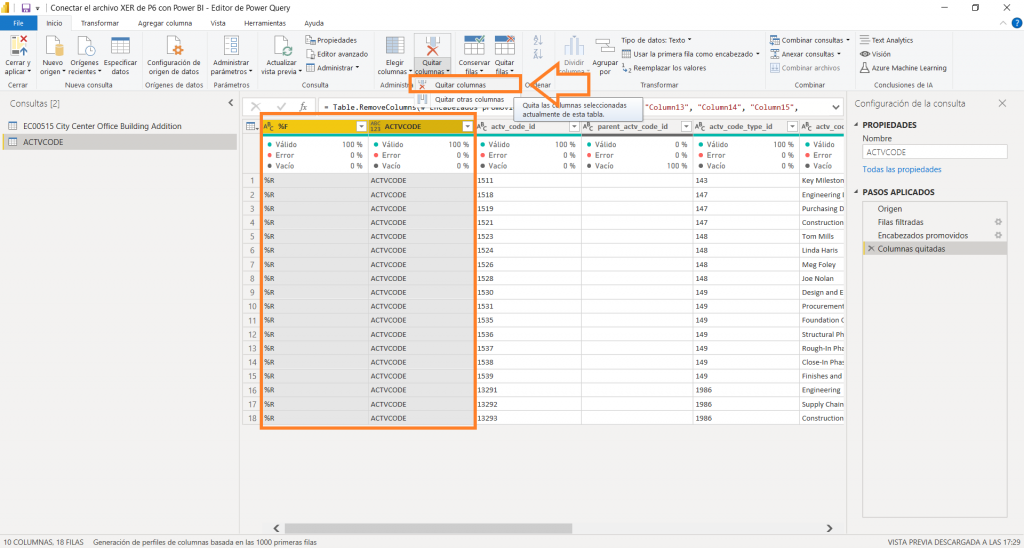
In order to have a table as clean as possible, we will eliminate those columns that we do not need, as well as those that are empty or have null values in them.
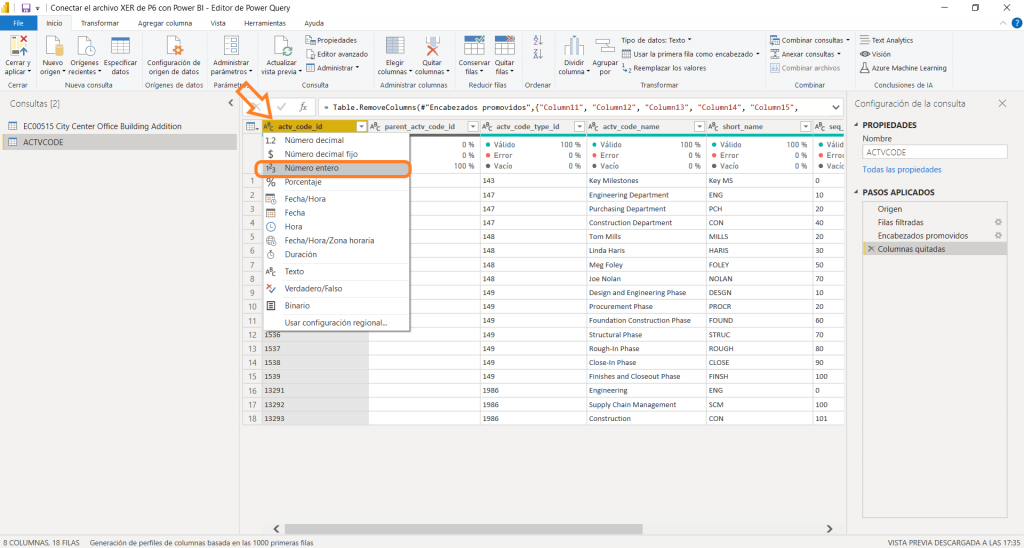
Finally, we will change the format of the columns as appropriate, paying more attention to date formats and decimal numbers for those fields that refer to quantities.
TIP OF THE DAY: in certain formats, the commas and periods may vary when we fetch information from the XER files. Our recommendation is that you select all the columns where there is a decimal delimiter that refers to amounts and in Transform – Replace values you change the points by commas. In this way, when changing the data type to a decimal number you will not lose the decimals.
And that’s all. Now you can Close and apply to be able to see all the changes in both the Report view, Data view, and Model view.
IN PROJECT 2080 WE WOULD LIKE YOU TO REMEMBER
You have just taken a big step as a project planner and project manager. Perhaps you are not yet aware of the great change that is coming in your professional life, but from now on the reports you were preparing will take on a new dimension. The universe of dynamic reports welcomes you. And all this without the need to link the Primavera P6 database with Power BI. Now it’s just a matter of knowing which XER file tables you’ll need to generate those reports that your peers will envy. And you know what? That we will help you with it.




22 May, 2022 @ 00:28
If you have the following tables in your .xer file do you need to transpose the data in these tables to link them to the other tables in the P6 datasets:
UDFType
UDFValue
23 May, 2022 @ 10:02
Hi Michael,
thanks for your message. The UDFType (User Defined Fields) and UDFValue (User Defined Field Values) tables are not needed to be transposed. You should link both tables via “udf_type_id” column. This field is Unique ID for UDFTYPE table, and part of the UDFVALUE table.
I hope this helps you.
Regards,
6 July, 2022 @ 11:16
Hi, Thanks for the blog above.
We’ve connected the P6 SQL tables directly to Power BI and are looking to create an S-curve from the data. I’ve noticed that each individual task code (TASK) has multiple rows with a new one being generated whenever the overall baseline gets updated. Do you know of any flag columns/filter columns that automatically filter for the most recent entry? I can get this data anyway in power bi but I’d rather use a built in column if theres one there.
Thanks,
12 July, 2022 @ 20:12
In Step 1 XER to Power BI, its better to select Text file and then split using tab delimiter, else Task Name (if it has commas) it will be big mess for XER file containing 50,000 or more activities.
13 July, 2022 @ 06:31
Thanks for your comment. Really appreciate, Abdul !!
3 September, 2022 @ 04:14
Is there a way to take the steps structure from within p6 and link within power bi?
5 September, 2022 @ 15:29
Dear Doug,
you can find all related to the activity steps on the TASKPROC Table, within the XER file.
Regards,
3 November, 2022 @ 21:51
Hi, I followed all the steps unfortunately it is not working for me! Am I doing anything wrong?
10 November, 2022 @ 21:08
Hi Zahir,
please drop us an email with some screenshots in order to find out where it is not working.
Regards,
8 November, 2022 @ 22:25
How is the Activity Code related to the Task. I can’t find an Activity_Code_id in the Task record?
Thanks
10 November, 2022 @ 21:06
Hi Stephen
They are related within the TASKACTV table. If you do not find it, please drop us an email.
Regards,
4 January, 2023 @ 17:11
Hi, thanks for this, really great step by step guide.
My question would be, how would this process manage importing future updates for tracking or even managing multiple projects in one PowerBI report without having to repeat all the steps?
4 January, 2023 @ 17:42
Hi Simon,
Thanks for your message. The only thing you must do is to record the updating “.XER” files on the same folder and use the same file name. Then, just refresh your queries. We hope this helps you. If you have further comments, please contact us.
Regards,
19 February, 2023 @ 11:42
Thanks for the detailed step by step guide. I couldn’t find the Earned Value Cost in any of the table. Please can you help
15 March, 2023 @ 08:42
Hi Ferdinard,
Earned Value Cost is included on the TASKFIN table (Activity Past Period Actuals), as a column named “bcwp”, within the P6 database. This data is not part of the XER file since it does include a few tables and columns. I hope this is helpful for you.
Regards,
8 September, 2023 @ 13:52
Hi,
How to get the start and finish dates from the XER file tables?
22 September, 2023 @ 08:20
Hi Wajida,
you can find activity dates on the TASK table: actual, early and late, as well as all remaining start and finish dates.
I hope this comments helps you.
Regards,
24 November, 2023 @ 16:20
Thanks for sharing,
This is interesting but details are missing,
For instance at step3 after the import of the XER as Text file in PBI you mention ” we must select the icon inside the “Power Query Editor” window, and with the right mouse button select the “CSV” option”.
There is no image to back-up that sentence and it is not detailed enough to figure it out properly. I have not find this “CSV Option” rather than I am not sure where am I supposed to right click (I guess in the Query title).
24 January, 2024 @ 07:18
Thanks for your message, Mathieu
You are right, it is not fully clear this steps and a screenshot is missing. What you mention refers to the heading: “How to open and view an XER file in Excel” (it is slighly above within the post). I hope this helps you.
Regards,